1.4.5.8.3.
Gestion des droits
1.4.5.8.3.2. Page d'onglet "Bases de données utilisateurs
|  |
| Précédent | Suivant |
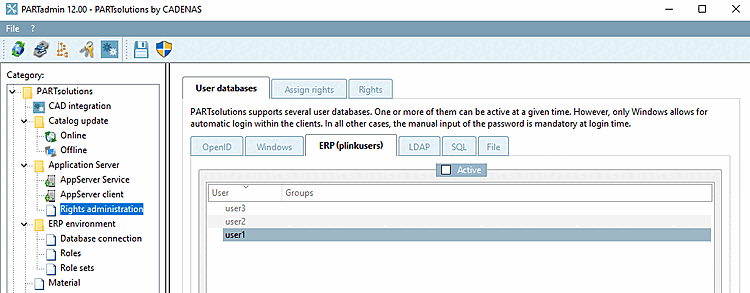
PARTsolutions supporte plusieurs bases de données d'utilisateurs alternatives. L'une d'entre elles ou toutes peuvent être actives en même temps. Toutefois, seul Windows est adapté à une connexion automatique dans les clients. Dans tous les autres cas, la saisie manuelle du mot de passe est impérative. [PARTsolutions supports several user databases. One or more of them can be active at a given time. However, only Windows allows for automatic login within the clients. In all other cases, the manual input of the password is mandatory at login time.]
Pour que les utilisateurs/groupes soient affichés sur la page d'onglet Attribution des droits [Assign rights], cochez la case Actif [Active] sur les pages d'onglet correspondantes. L'ordre d'évaluation correspond à l'ordre des onglets : Windows, puis ERP, puis les autres...
Limite pour les requêtes [Limit for queries]: la valeur maximale est 999999.
Limiter peut être utile, mais peut aussi conduire à ce que les résultats présentés ne soient pas complets.
Au plus tard à partir d'un nombre d'entrées >9999 dans AD, la fonction de recherche sous Affectation des droits [Assign rights] -> Utilisateurs/groupes connus [Known users/groups] ne fonctionne définitivement plus de manière fiable, mais peut-être aussi avant, ce qui peut être évité en cliquant sur le bouton . peut être intercepté.
En principe, le comportement dépend fortement du serveur AD concret.
![Onglet Bases de données utilisateur [User databases] > Onglet OpenID](https://webapi.partcommunity.com/service/help/latest/pages/fr/partsolutions_user/doc/resources/img/img_0761aa87360042d28ad79e8934d4afd4.png)
Microsoft Azure AD: choisir Azure comme fournisseur OpenId. Si aucun émetteur explicite n'est indiqué, c'est celui dans lequel l'ordinateur est intégré qui sera utilisé. Si Client-Secret est indiqué et que les droits nécessaires ont été attribués à l'application dans le portail Azure, les utilisateurs et les groupes peuvent également être lus via le graph-api. [Choose Azure as the OpenId provider. If no explicit issuer is specified, the one in which the computer is integrated is used. If the client secret is specified and the application has been assigned the necessary rights in the Azure portal, users and groups can also be read out via the graph api.]
Other OpenID Provider: n'importe quel autre fournisseur Open-ID (keycloak, etc...) La liste interactive des groupes n'est pas possible ici. [Any other Open-ID provider (keycloak, etc...) Interactive listing of groups is not possible here.]
Issuer: cette url indique le chemin vers le fournisseur Openid Realm ou le client Azure. [This url specifies the path to the Openid provider realm or Azure tenant.]
Client-ID/App-ID: l'ID de l'application ou l'ID client pour 3Dfindit dans le prrovider OpenId (AppId dans le registre des applications du portail Azure) [The application ID or client ID for 3Dfindit in the OpenId provider (AppId in the application registration of the Azure portal)]
Secret client [Client-Secret]: Le secret client qui est enregistré dans l'application pour ce client. Peut être omis si l'on n'a pas besoin de lister les utilisateurs/groupes via l'API de graphique. N'est pertinent que pour Azure. [The client secret that is stored in the app registration for this client. Can be omitted if there is no need to list the users/groups via the Graph API. Is only relevant for Azure.]
Client-Redirect-Uri: l'URI de redirection enregistrée dans le registre de l'application qui doit être utilisée est saisie ici. Si ce champ est vide, https://localhost/auth/login est utilisé. Cette URI doit alors être autorisée dans le registre de l'application. Cette entrée est uniquement destinée à la plateforme Mobile-Device et Desktop-Applications. Elle n'est pas utilisée dans le cas d'une application web pour 3Dfindit, mais uniquement pour le login dans PARTadmin ou PARTdataManager. L'URI saisi ici peut être totalement fictif, car il n'est pertinent que pour l'évaluation de la redirection du fournisseur OpenID. [The redirect URI stored in the app registration that is to be used is entered here. If this field is empty, https://localhost/auth/login is used. This URI must then be allowed in the app registration. This entry is only intended for the mobile device and desktop applications platform. It is not used in the web application for 3dfindit, but only for the login to PARTadmin or PARTdataManager. The URI entered here can be completely fictitious, as it is only relevant for the evaluation of the redirect from the OpenID provider.]
Scopes: scopes nécessaires pour l'authentification. Séparés par des espaces. La valeur par défaut est "openid offline_access". [Required scopes for authentication. Separated by spaces. The default is "openid offline_access"]
Username Claims: liste séparée par des virgules des revendications qui doivent être considérées comme la source de l'ID utilisateur. La valeur par défaut est ici "unique_name,preferred_username,upn". [Comma-separated list of claims to be considered as the source for the user ID. The default setting here is "unique_name,preferred_username,upn"]
Claim de groupe [Group Claim]: nom du claim à partir duquel l'appartenance à un groupe doit être extraite. Le standard est "groups" pour Azure et "roles" pour tout le reste. Peut être changé pour n'importe quelle autre revendication ici. [Name of the claim from which the group membership is to be extracted. The default is "groups" for Azure and "roles" for everything else. Can be switched to any other claim here.]
Groupe obligatoire [Required group]: nom d'un groupe dans lequel le bentzer doit être pour être considéré comme un utilisateur valide. Si aucune entrée n'est indiquée, tous les utilisateurs sont considérés comme valides. [Name of a group in which the user must be in order to be considered a valid user. If no entry is specified, all users are considered valid.]
Case à cocher : Déterminer des attributs supplémentaires via le point de terminaison UserInfo [Identify additional attributes using the UserInfo endpoint] (Non pertinent pour Azure.)
Configuration de SSO via Microsoft Azure
Note: OpenID ne fonctionne pas dans les processus batch (c'est pourquoi Windows doit également être activé sous Bases de données utilisateur [User databases] ).
Vous trouverez ci-dessous une description détaillée qu'il vous suffira d'adapter à votre propre environnement.
Dans un premier temps, créez dans votre entreprise un enregistrement d'application pour CADENAS 3Dfindit dans Microsoft Azure.
Rendez-vous sur https://portal.azure.com.
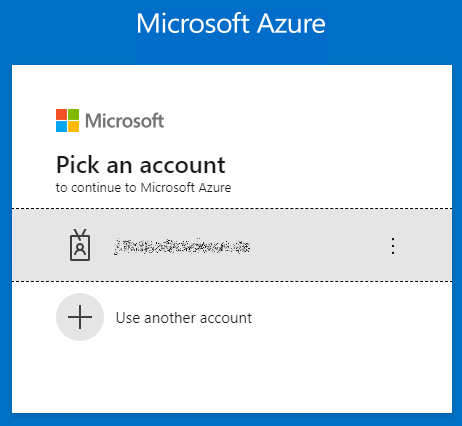
Connectez-vous à Microsoft Azure avec votre compte Microsoft.
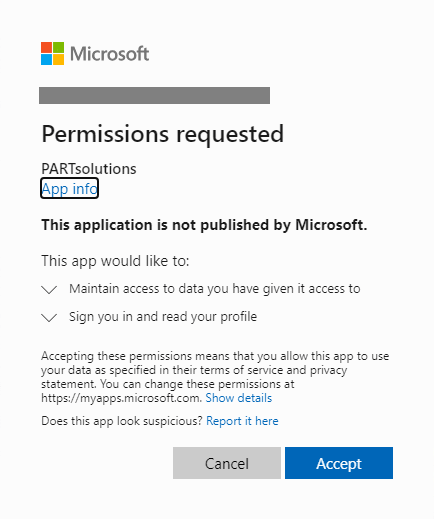
Si des autorisations API ont été définies, la demande suivante apparaît en plus, sauf si l'administration a défini un admin-consent pour tous les utilisateurs. Sinon, chaque utilisateur doit donner lui-même son accord explicite. Voir ci-dessous.
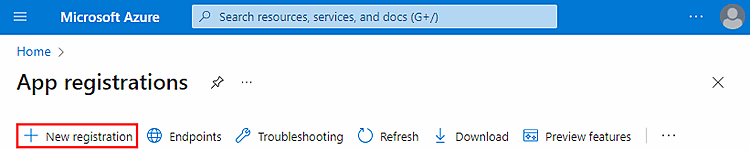
Cliquez sur Enregistrements d'apps.
Cliquez sur Nouvel enregistrement.
Remplissez la boîte de dialogue Enregistrer l'application et cliquez ensuite sur .
Nom: Saisissez un nom d'affichage de votre choix (par ex. "CADENAS 3Dfindit").
Types de comptes pris en charge: sélectionnez l'option Uniquement les comptes dans ce répertoire d'organisation (uniquement "<votre entreprise>" - mandant unique) (dans l'exemple d'illustration "CADENAS Technologies AG"),
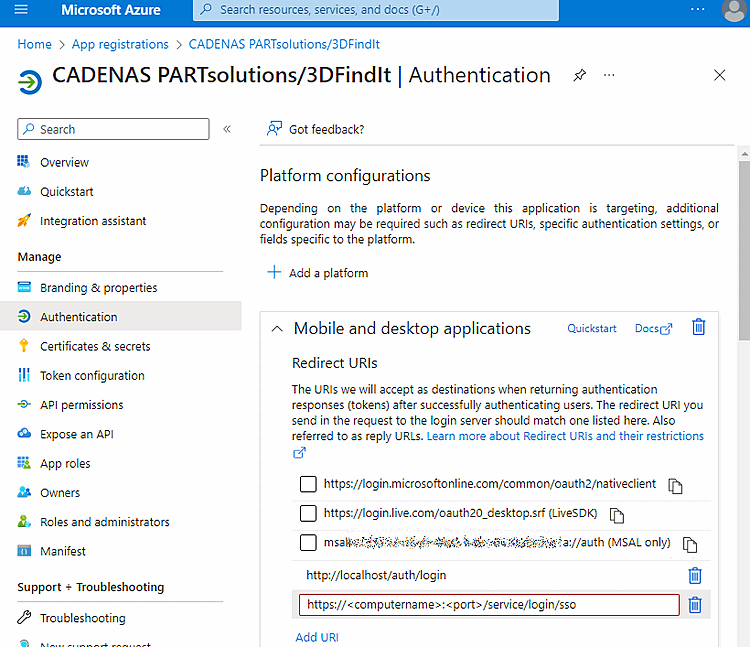
URI de redirection (facultatif): sélectionnez Client public/natif (mobile et bureau) dans la zone de liste et saisissez http://localhost/auth/login dans le champ de saisie.
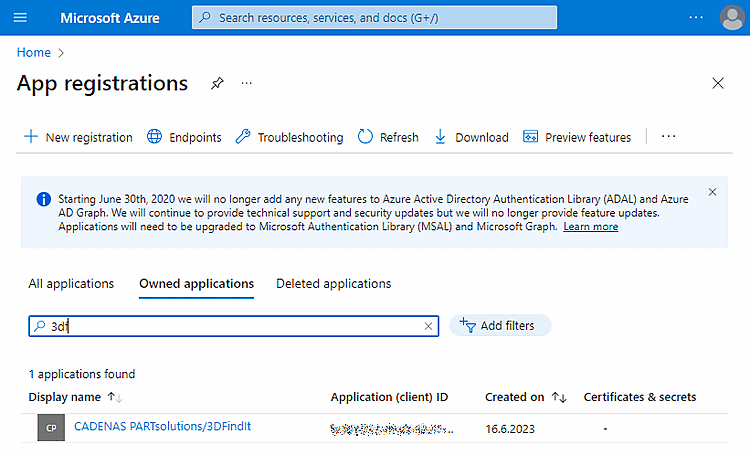
Filtrez selon l'application que vous venez de créer.
Sélectionnez l'option Authentification.
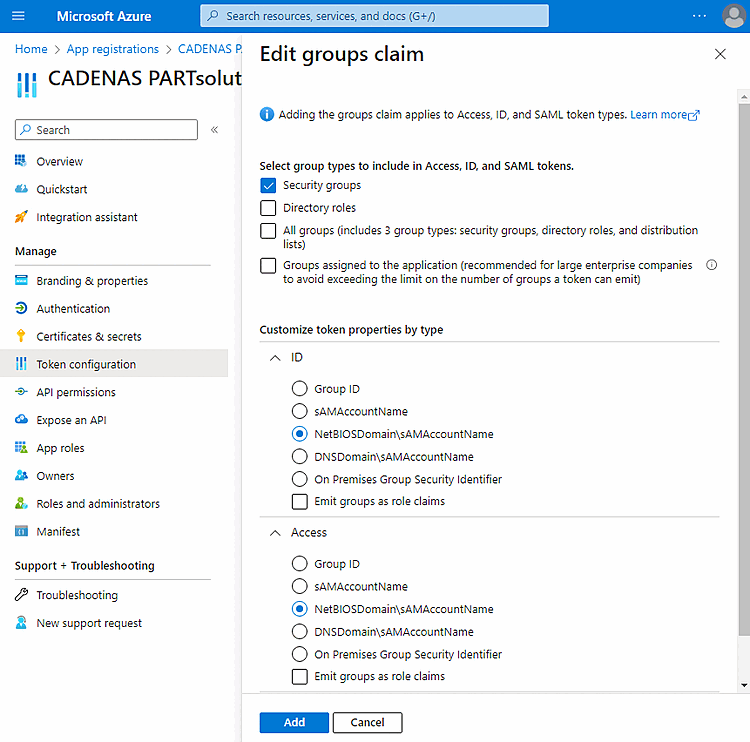
Sélectionnez l'option Configuration des jetons et cliquez sur Ajouter une revendication de groupe.
Remplissez la page de dialogue Traiter les revendications de groupe comme suit :
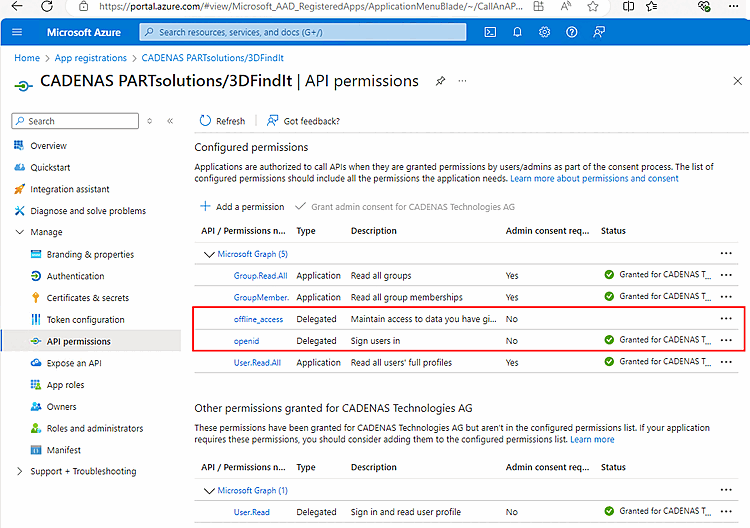
Pour que le login fonctionne, les autorisations API suivantes doivent être activées :
Le type doit être défini sur "Délégué".
Si Group.Read.All et GroupMember.Read.All et User.Read.All ensemble supplémentaire puis dans PARTadmin , les utilisateurs et les groupes peuvent être peut être répertorié. Pour une authentification pure, il ne s’agit pas nécessaire.
S'il est nécessaire de contourner la limitation de la taille des attributs pour les groupes, procédez comme suit :
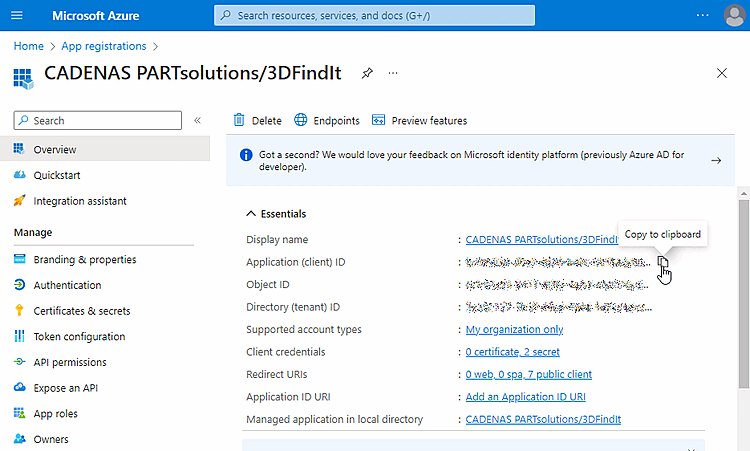
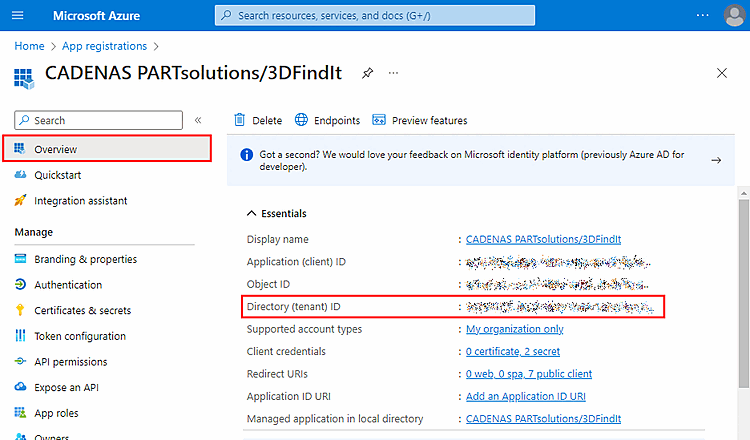
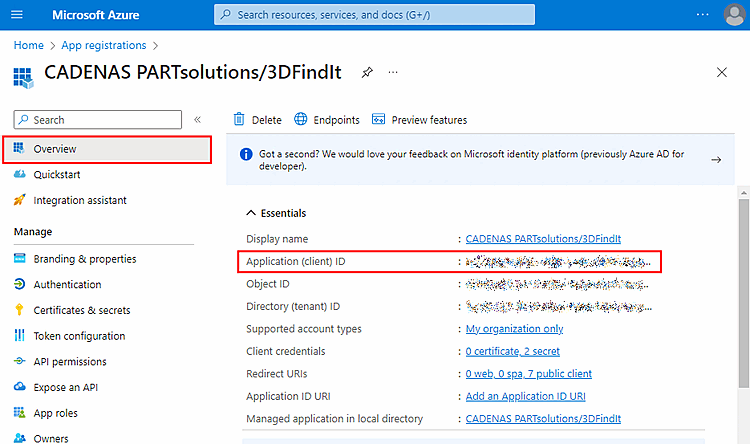
Ouvrez le résumé. Ici, vous pouvez copier les identifiants souhaités dans le presse-papiers pour les coller ensuite dans PARTadmin.


Dans PARTadmin, sous la catégorie Gestion des droits [Rights administration], sélectionnez l'onglet Bases de données utilisateurs [User databases] et la sous-page OpenID.
Sous Basic Type, sélectionnez l'option Microsoft Azure AD.
![Bases de données utilisateurs [User databases] -> OpenID](https://webapi.partcommunity.com/service/help/latest/pages/fr/partsolutions_user/doc/resources/img/img_743f5ffb145b4bb48b2900ea0c20fd61.png)
Remplissez les différents champs en fonction des données de Microsoft Azure :
Issuer: cette url indique le chemin d'accès au fournisseur OpenID Realm ou duenant Azure. [This url specifies the path to the Openid provider realm or Azure tenant.]
https://login.microsoftonline.com/<Tenant-ID>/
Client-ID/App-ID: l'ID de l'application ou l'ID du client pour PARTsolutions dans le fournisseur OpenID (AppId dans l'enregistrement de l'application du portail Azure) [The application ID or client ID for PARTsolutions in the OpenId provider (AppId in the application registration of the Azure portal)]
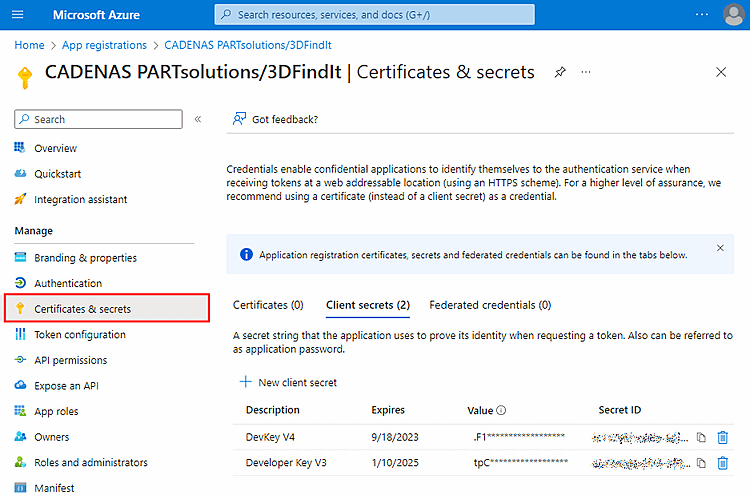
Secret client [Client-Secret]: Le secret client qui est enregistré dans l'application pour ce client. Peut être omis si l'on n'a pas besoin de lister les utilisateurs/groupes via l'API de graphique. N'est pertinent que pour Azure. [The client secret that is stored in the app registration for this client. Can be omitted if there is no need to list the users/groups via the Graph API. Is only relevant for Azure.]
Le groupe souhaité peut également être ajouté manuellement en utilisant Test... pour déterminer le nom correct du groupe. est utilisé.
Normalement, cette option n'est pas absolument nécessaire, à moins que l'option Déterminer des attributs supplémentaires via le point final UserInfo [Identify additional attributes using the UserInfo endpoint] soit activée.
Sous Certificats & secrets, vous pouvez créer et lire des ID.
Uri de redirection client [Client-Redirect-Uri]: si un client rencontre des problèmes lors de la mise en place de l'OpenID, il doit utiliser ce paramètre et l'URI msal de sa page d'enregistrement d'app.
On saisit ici l'URI de redirection enregistrée dans l'enregistrement de l'application qui doit être utilisée. Si ce champ est vide, https://localhost/auth/login est utilisé. Cette URI doit alors être autorisée dans le registre de l'application. Cette entrée est uniquement destinée à la plateforme Mobile-Device et Desktop-Applications. Elle n'est pas utilisée dans le cas d'une application web pour 3dfindit, mais uniquement pour le login dans PARTadmin ou PARTdataManager. L'URI saisi ici peut être totalement fictif, car il n'est pertinent que pour l'évaluation de la redirection du fournisseur OpenID. [The redirect URI stored in the app registration that is to be used is entered here. If this field is empty, https://localhost/auth/login is used. This URI must then be allowed in the app registration. This entry is only intended for the mobile device and desktop applications platform. It is not used in the web application for 3dfindit, but only for the login to PARTadmin or PARTdataManager. The URI entered here can be completely fictitious, as it is only relevant for the evaluation of the redirect from the OpenID provider.]
msa64992203d-d6b0-4900-c40c-641ba8c06e1a://auth
Scopes: Scopes nécessaires pour l'authentification. Séparés par des espaces. [Required scopes for authentication. Separated by spaces. The default is "openid offline_access"] La valeur par défaut est "openid offline_access". [Required scopes for authentication. Separated by spaces. The default is "openid offline_access"]
Réclamations du nom d'utilisateur [Username-Claims] (facultatif) : Liste séparée par des virgules de revendications qui doivent être considérées comme source pour l'ID utilisateur. La valeur par défaut est ici "preferred_username,upn,email,sub" [Comma-separated list of claims to be considered as the source for the user ID. The default setting here is "preferred_username,upn,email,sub"].
Réclamation de groupe [Group Claim] (facultatif) : Nom de la revendication à partir de laquelle l'appartenance à un groupe doit être extraite. Le standard est "groups" pour Azure et "roles" pour tout le reste. Peut être converti en n'importe quel autre claim ici. [Name of the claim from which the group membership is to be extracted. The default is "groups" for Azure and "roles" for everything else. Can be switched to any other claim here.]
Groupe requis [Required group]: nom d'un groupe auquel l'utilisateur doit appartenir pour être considéré comme un utilisateur valide. Si aucune entrée n'est indiquée, tous les utilisateurs sont considérés comme valides. [Name of a group in which the user must be in order to be considered a valid user. If no entry is specified, all users are considered valid.]
Déterminer des attributs supplémentaires via le point final UserInfo [Identify additional attributes using the UserInfo endpoint]: Non pertinent pour Azure.
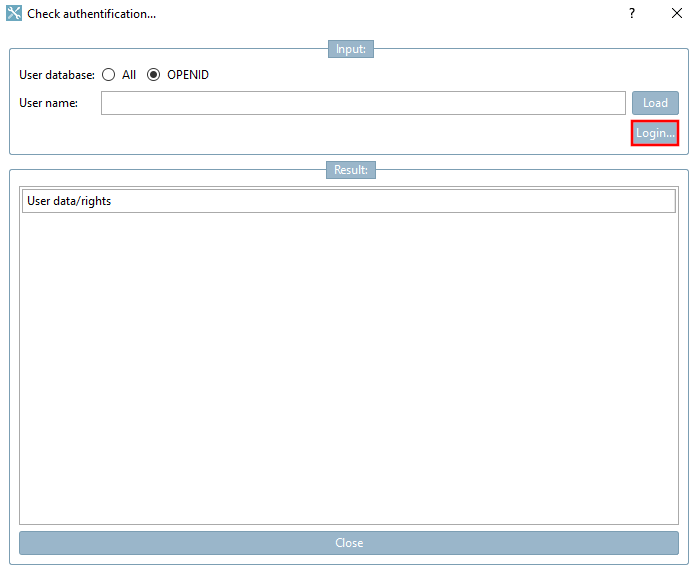
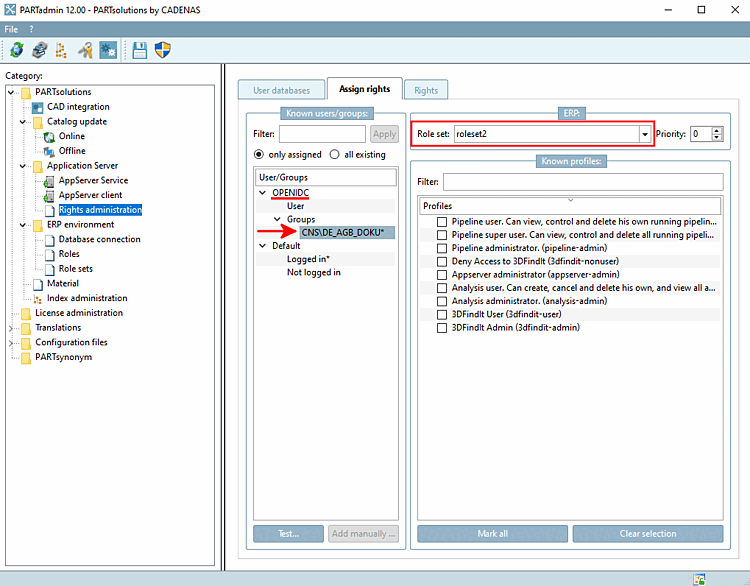
Ouvrez PARTadmin -> Catégorie Gestion des droits [Rights administration] -> Page d'onglet Attribution des droits [Assign rights].
-> La boîte de dialogue Vérifier l'authentification. [Check authentification...].. s'ouvre.
Sélectionnez l'option OPENID et cliquez sur Connexion.... [Login...]
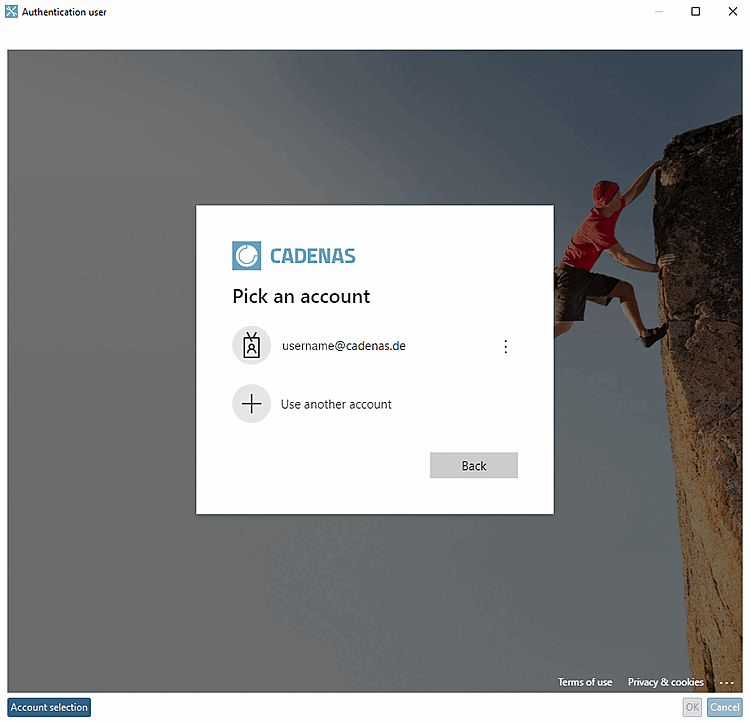
-> La boîte de dialogue Authentifier l'utilisateur [Authenticate user] s'ouvre.
Cliquez sur votre compte, saisissez votre mot de passe et cliquez sur .
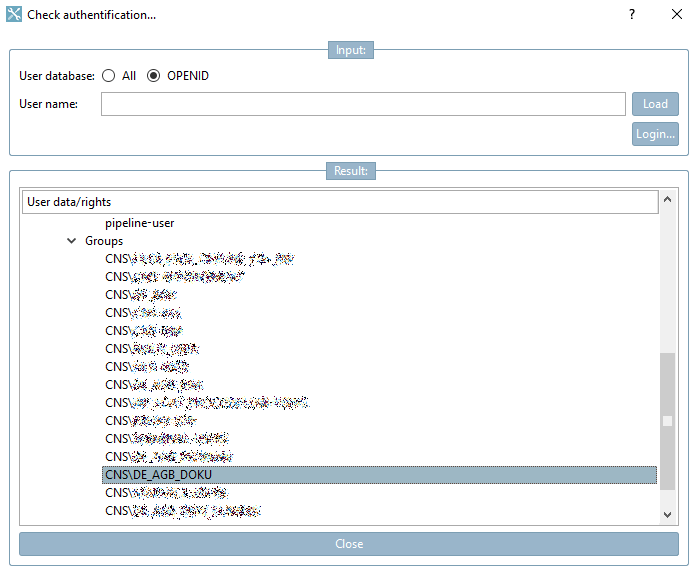
-> Dans la zone de dialogue Résultat [Result], les données sont affichées.
Notez l'utilisateur ou le groupe souhaité et fermez la boîte de dialogue.
Sélectionnez l'entrée User ou Groups et cliquez sur
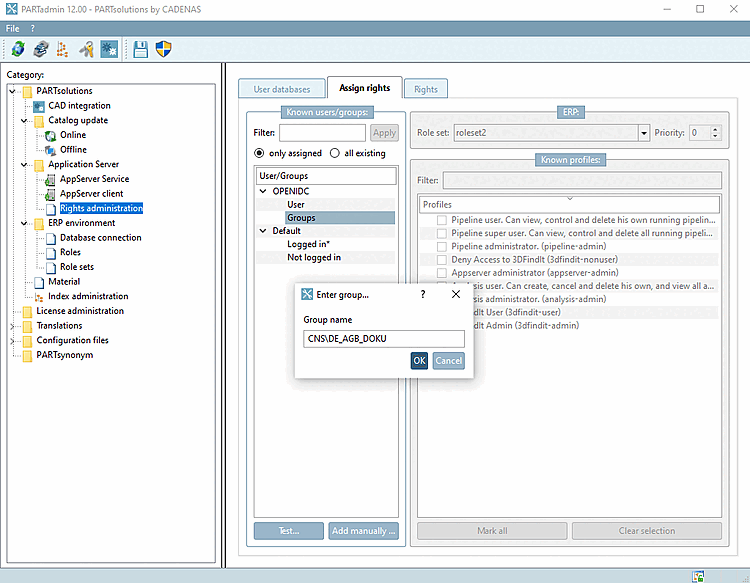
-> La boîte de dialogue Entrer groupe. [Enter group...].. s'ouvre.
Saisissez le nom de l'utilisateur ou du groupe et confirmez en cliquant sur .
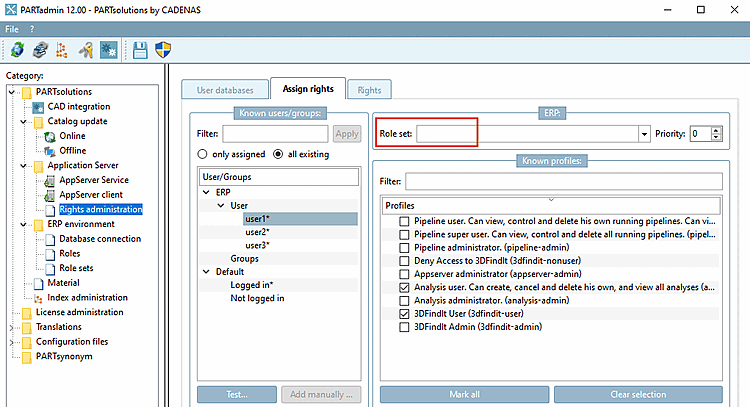
Attribuez le jeu de rôles souhaité au groupe ou à l'utilisateur sélectionné.
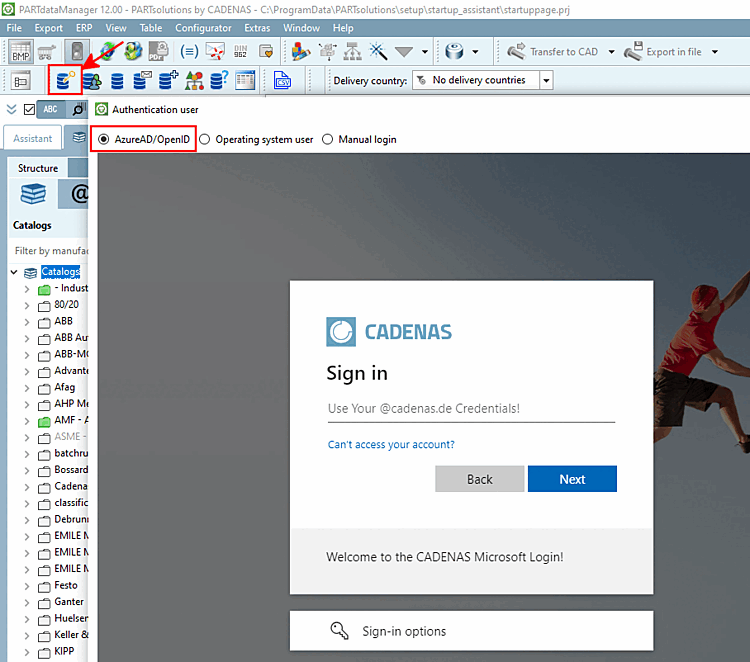
Pour tester, lancez PARTdataManager et cliquez sur le bouton Authentifier/changer d'utilisateur [Authenticate/switch users].
-> La boîte de dialogue Authentifier l'utilisateur [Authenticate user] s'ouvre.
Connectez-vous avec votre nom d'utilisateur (e-mail) et votre mot de passe.
![Page d'onglet "Attribution de droits [Assign rights]](https://webapi.partcommunity.com/service/help/latest/pages/fr/partsolutions_user/doc/resources/img/img_367fffe0cebb4975a4e3e786729825c1.png)
![[Remarque]](https://webapi.partcommunity.com/service/help/latest/pages/fr/partsolutions_user/doc/images/note.png)
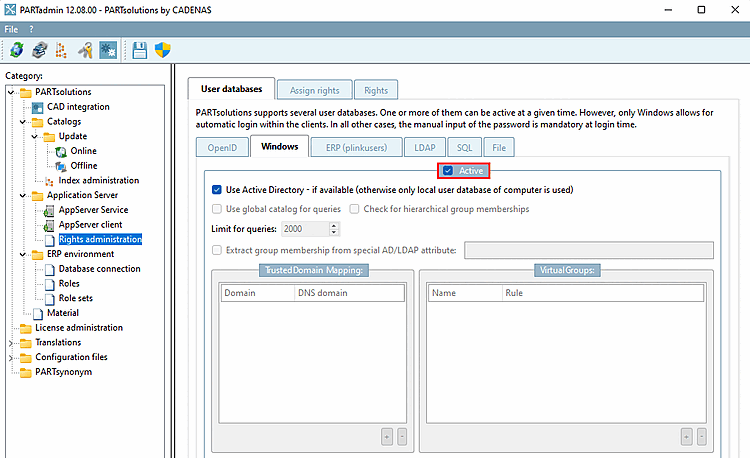
Si un login par utilisateur Windows doit être possible (connexion automatique), l'option Actif [Active] doit être activée dans l'onglet Windows.
Par défaut, l'option Actif [Active] est activée, ce qui est judicieux dans la grande majorité des cas.
Si elle est désactivée, l'authentification de l'utilisateur basée sur Windows ne peut pas avoir lieu.
Utilise Active-Directory si disponible (sinon, seule la base de données des utilisateurs locaux de l'ordinateur est utilisée) [Use Active Directory - if available (otherwise only local user database of computer is used)]:
Dans les scénarios Azure-ID / Entra-ID, les ordinateurs peuvent ne pas être en mesure de résoudre les utilisateurs AD via l'accès au contrôleur AD (même s'ils sont toujours connectés à un domaine).
Dans de telles situations, il n'est pas conseillé d'essayer de dissoudre des utilisateurs via AD.
Cette option permet de désactiver les recherches AD. La base de données des utilisateurs locaux reste utilisable, car le serveur peut fonctionner comme un compte d'utilisateur local.
Utiliser le catalogue global pour les requêtes [Use global catalog for queries]: Activez l'option pour une forêt Active Directory (la valeur par défaut est "désactivée").
Limitation pour les requêtes [Limit for queries]: veillez à ne pas inscrire 0!
Cela se produit lorsque l'on décoche la case Actif [Active] pour Windows, puis que l'on quitte PARTadmin et que l'on redémarre, avant de réactiver la base de données utilisateurs "Windows".
Tenir compte des appartenances de groupe imbriquées [Check for hierarchical group memberships]: L'évaluation s'effectue de manière récursive sur des niveaux hiérarchiquement supérieurs.
Extraire l'appartenance à un groupe à partir d'un attribut AD/LDAP spécial [Extract group membership from special AD/LDAP attribute]:
![[Astuce]](https://webapi.partcommunity.com/service/help/latest/pages/fr/partsolutions_user/doc/images/tip.png)
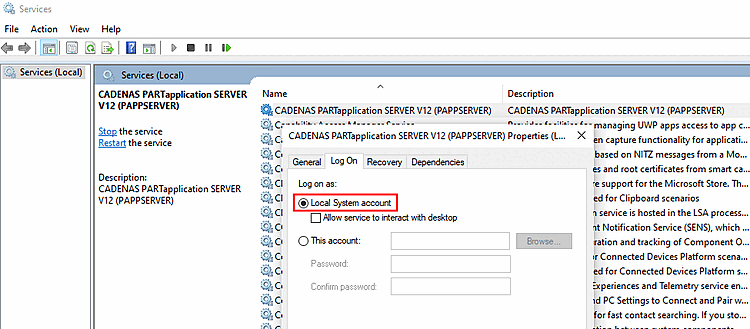
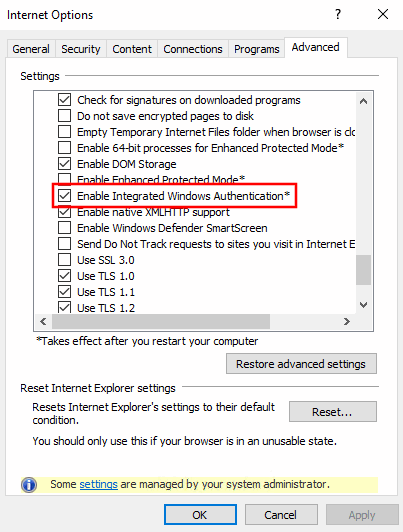
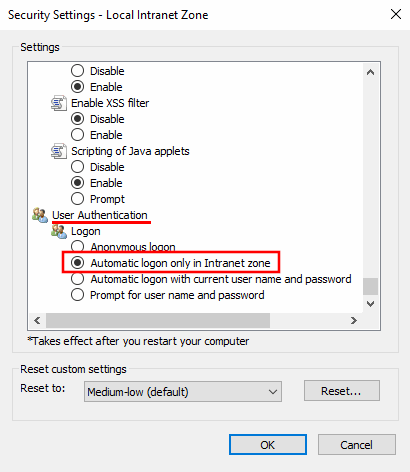
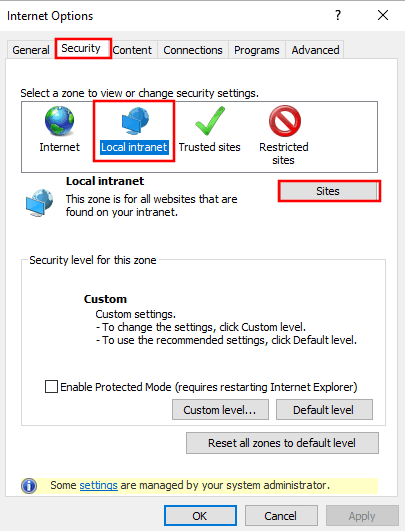
Si vous rencontrez des problèmes avec la connexion automatique dans PARTapplicationServer via le nom d'utilisateur Windows, veuillez vérifier les paramètres de base suivants :
Dans la boîte de dialogue "Propriétés d'Internet" -> onglet "Avancé", l'option "Activer l'authentification intégrée de Windows" doit être activée.
Dans la boîte de dialogue "Paramètres de sécurité - Zone Internet", l'option "Connexion automatique uniquement dans la zone Intranet" doit être activée.
L'adresse http du serveur d'applications doit être incluse dans la zone de sécurité locale.
Si le login avec des utilisateurs ERP doit être possible dans la boîte de dialogue Authentification de l'utilisateur, l'option Actif [Active] doit être activée (par défaut).
Pour l’investissement
Des droits d’administrateur sont exigés des utilisateurs. Pour y parvenir,
cliquez sur le bouton en haut de la barre d’outils  Lancer le programme avec
Nouveaux privilèges d’administrateur [Restart the program with administrative privileges].
Lancer le programme avec
Nouveaux privilèges d’administrateur [Restart the program with administrative privileges].
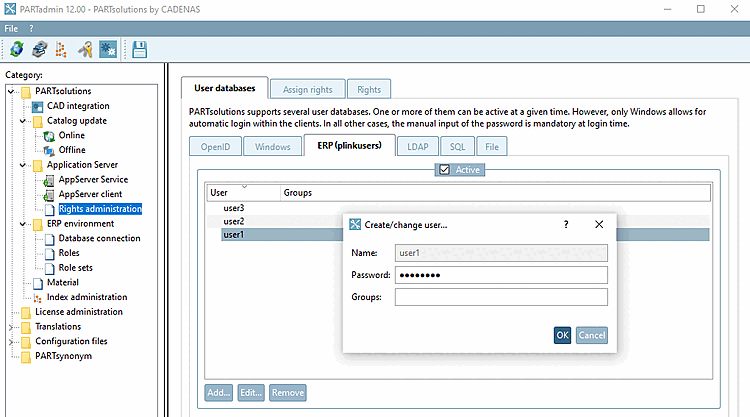
Créez des utilisateurs en cliquant sur le bouton .. pour créer un utilisateur. Attribuez un nom [Name] et un mot de passe [Password] dans le dialogue. Si vous souhaitez modifier le mot de passe ultérieurement (via ..), il vous suffit d'en définir un nouveau (l'ancien ne sera pas affiché).
Si les conditions susmentionnées sont remplies, l'authentification de l'utilisateur peut être effectuée dans la boîte de dialogue Authentifier l'utilisateur [Authenticate user] avec saisie de l'utilisateur et du mot de passe.
![Authentifier l'utilisateur [Authenticate user]: Saisie de l'utilisateur et du mot de passe](https://webapi.partcommunity.com/service/help/latest/pages/fr/partsolutions_user/doc/resources/img/img_d3a2d6f925a0456181778062d2643943.png)
Si plusieurs rôles sont disponibles, la fenêtre de dialogue Sélectionner le rôle [Select role] s'ouvre.
![Choisir un rôle [Select role]](https://webapi.partcommunity.com/service/help/latest/pages/fr/partsolutions_user/doc/resources/img/img_c0b4f6644dbb4f78aed656170e20ff00.png)
Si aucune authentification ne peut être effectuée pour un utilisateur, le message d'erreur Nom d'utilisateur ou mot de passe non valide ! [Invalid username or password!] s'affiche :
![Nom d'utilisateur ou mot de passe non valide ! [Invalid username or password!]](https://webapi.partcommunity.com/service/help/latest/pages/fr/partsolutions_user/doc/resources/img/img_8513121bec6840b79d8bb1bba87f23ab.png)