3.2.9. Mappatura dei materiali
3.2.9.2. Mappatura dei materiali con integrazione ERP
|  |
| Indietro | Avanti |
In 3Dfindit con integrazione ERP, il materiale viene visualizzato o selezionato nella colonna MAT_NAME per impostazione predefinita.

La seguente panoramica illustra le relazioni:
File di configurazione relativi a 3Dfindit
Figura 3.40. A sinistra: $CADENAS_SETUP/material_assign.cfg - A destra: $CADENAS_SETUP/material_assign.def
$CADENAS_SETUP/material_assign.cfgIl nuovo numero di identificazione che può essere selezionato nella finestra di dialogo Nuovo numero di identificazione [new ident-no.] I materiali 3Dfindit sono memorizzati nel file di configurazione
material_assign.cfg.Se necessario, è possibile aggiungere i propri materiali in qualsiasi momento secondo la struttura predefinita.
I blocchi definiscono i cataloghi/directory/sottodirectory/progetti a cui si applica la specifica.
$CADENAS_SETUP/material_assign.defIl file contiene i termini di traduzione dei materiali.
Se la parte da esportare in CAD si trova nella PARTdataManager non ERP_PDM_NUMBER ancora e non dispone di materiale, fare clic su Aggiungi record per collegare il database [Add dataset to link database]
 aprire la finestra di dialogo nella barra degli strumenti ERP
Nuovo numero di identificazione [new ident-no.]. Nella casella di riepilogo sotto
materiale [Material], i valori di
aprire la finestra di dialogo nella barra degli strumenti ERP
Nuovo numero di identificazione [new ident-no.]. Nella casella di riepilogo sotto
materiale [Material], i valori di material_assign.cfgo il valore Valori tradotti damaterial_assign.defVisualizzato.File di configurazione relativi al sistema CAD (qui un esempio per Inventor)
Assicurarsi che tutti i materiali 3Dfindit utilizzati siano correttamente mappati sui corrispondenti materiali del sistema CAD.
$CADENAS_SETUP/if<cadname>.cfgAprire il file di configurazione specifico del sistema CAD nell'editor di testo.
Nel blocco [MatMap], il nome del materiale 3Dfindit (a sinistra del segno di uguaglianza reale) è collegato al nome del materiale CAD (a destra del segno di uguaglianza reale).
In alternativa, effettuare le impostazioni in PARTadmin.
Aprire il file di configurazione specifico del sistema CAD e aprire il blocco [MatMap].
Figura 3.43. Modifica [MatMap] nella categoria PARTadmin -> File di configurazione: il nome della chiave è il nome del materiale 3Dfindit, il valore della chiave è il nome del materiale del sistema CAD.
Determinare i nomi dei materiali nel sistema CAD.
Esempio di utilizzo di Inventor:
Aprire "Documenti pubblici \ AutoDesk \ Inventor \ Dati di progettazione - MaterialMapping.xml".
Questo è l'inventore XML con tutti i materiali disponibili in Inventor. Qui troverai il nome del materiale interno di Inventor immesso in
$CADENAS_SETUP/ifadeskinv.cfgnella cartella Blocca [MatMap]. Il nome interno può essere utilizzato direttamente come tale è contrassegnato:<Style InternalName= „<NUMBER>:<MATERIALNAME> “
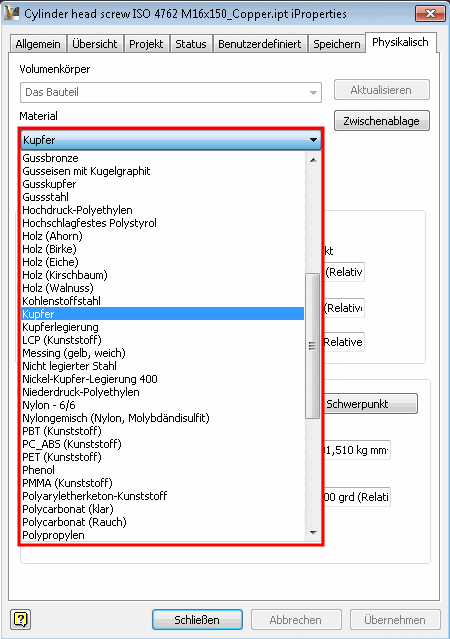
In alternativa, è possibile esportare una parte in Inventor, richiamare le iProperties e guardare la pagina della scheda "Fisica" per vedere quali materiali sono disponibili nel campo elenco e ottenere la designazione esatta.
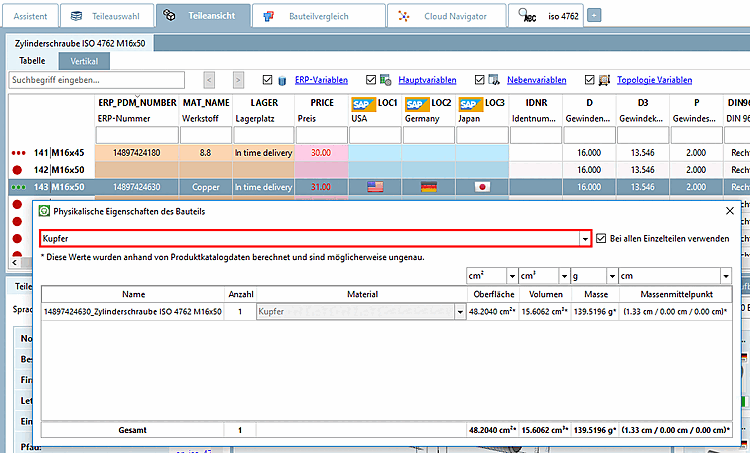
Cercare le proprietà fisiche nel PARTdataManager
PARTdataManager -> Menu Extra [Extras] -> Proprietà fisiche del componente [Physical properties of the part]
Se si
material.cfg(NONmaterial_assign.cfg) al materiali hanno memorizzato i valori di densità desiderati, vengono visualizzati nel PARTdataManager il fisico Proprietà in Proprietà fisiche del componente. [Physical properties of the part] Nella casella di riepilogo, selezionare l'icona materiale desiderato.Attributo del materiale nel sistema CAD
Esempio di utilizzo di Inventor: pagina della scheda iProperties di Inventor -> "Definito dall'utente".
La figura seguente mostra il nome del materiale non tradotto sotto MAT_NAME.
Proprietà fisiche del componente trasferito nel sistema CAD
Esempio di utilizzo di Inventor: pagina iProperties di Inventor -> scheda "Fisico".
L'illustrazione seguente mostra che il materiale 3Dfindit è stato mappato correttamente sul materiale di Inventor e che la massa è stata calcolata utilizzando i valori del materiale di Inventor.

![[Importante]](https://webapi.partcommunity.com/service/help/latest/pages/it/installation_ecatalogsolutions/doc/images/important.png)
![[MatMap] modifica nell'editor di testo](https://webapi.partcommunity.com/service/help/latest/pages/it/installation_ecatalogsolutions/doc/resources/img/img_15c372e041324ce4ad891fde0622efb8.png)
![Modifica [MatMap] nella categoria PARTadmin -> File di configurazione: il nome della chiave è il nome del materiale 3Dfindit, il valore della chiave è il nome del materiale del sistema CAD.](https://webapi.partcommunity.com/service/help/latest/pages/it/installation_ecatalogsolutions/doc/resources/img/img_9f6fae1cecdb44d38046b4ef43ee7a60.png)