
![[Remarque]](https://webapi.partcommunity.com/service/help/latest/pages/fr/partsolutions_user/doc/images/note.png) | Remarque |
|---|---|
N'effectuez pas une installation connectée via un lecteur réseau, mais uniquement directement sur l'ordinateur concerné ! | |
Les illustrations suivantes s'orientent vers l'exemple d'une installation de serveur, voire d'une installation individuelle.
Par défaut
L’installation est réalisée sous C:\Program Files\ENTERPRISE
3Dfindit.
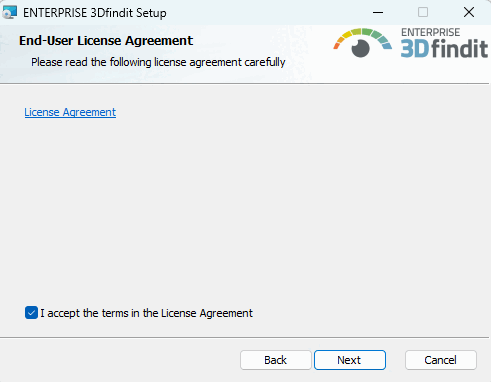
Avant d'exécuter le programme d'installation, fermez tous les programmes et services encore ouverts.
Acceptez les conditions du contrat de licence et cliquez sur .
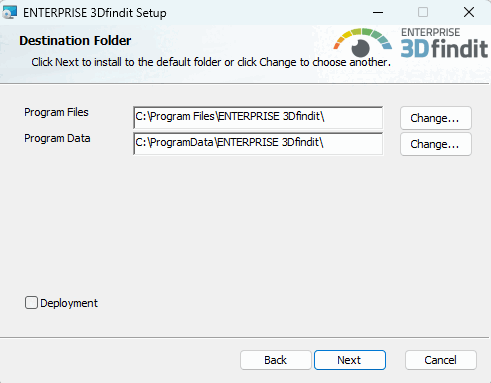
Dossier de destination [Destination Folder]
Déterminez les dossiers dans lesquels le logiciel doit être installé.
Le bouton vous permet de sélectionner un autre dossier que celui par défaut sur le disque dur (si nécessaire).
![[Important]](https://webapi.partcommunity.com/service/help/latest/pages/fr/partsolutions_user/doc/images/important.png)
Important Les Program Files et les Program Data doivent être indépendants les uns des autres !
La 1ère règle ne doit pas être contournée dans le deuxième dialogue de Destination Folder.
CADENAS_DATA, CADENAS_POOL, CADENAS_SITESETUP, CADENAS_USER ne doit pas se trouver dans ou sous le dossier "Program Files" (installation du logiciel) !
Raison : le répertoire du logiciel est entièrement fourni par MSI et les fichiers supplémentaires doivent être supprimés au préalable afin d'éviter tout conflit avec des fichiers anciens ou obsolètes.
Exemple de structure de répertoire correcte :
Program Files=c:\cad\software
CADENAS=c:\cad\software
CAENAS_DATA=c:\cad\data  <-- ok ..
CADENAS_POOL=c:\cad\pool <-- ok ..
Exemple de structure de répertoire erronée :
Program Files=c:\cad\
CADENAS=c:\cad
CAENAS_DATA=c:\cad\data  <-- error
CADENAS_POOL=c:\cad\pool <-- error
En cas de structure de répertoire erronée, un message d'erreur correspondant apparaît.
POOL ne doit jamais être inférieur à DATA !
Attention! En utilisant Deployment, vous êtes entièrement libre de définir les structures de répertoire. Mais toutes les vérifications effectuées par le logiciel sont alors annulées !
Deployment peut/doit également être utilisé pour les déploiements de clients. Une image créée par un admin/consultant peut ensuite être distribuée aux clients par copier/partager. Seuls les fichiers sont copiés, sans les entrées système. Il est possible de créer autant de copies que souhaité. (Veillez à choisir à chaque fois un répertoire cible différent).
Cliquez sur lorsque vous avez fait votre choix.
→ La deuxième page de paramètres de Destination Folder s'ouvre.
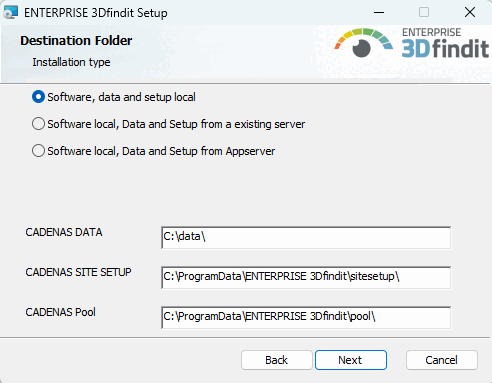
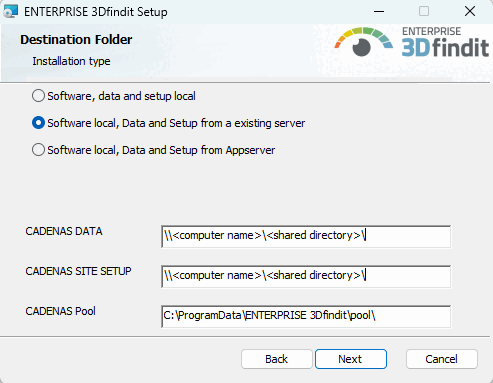
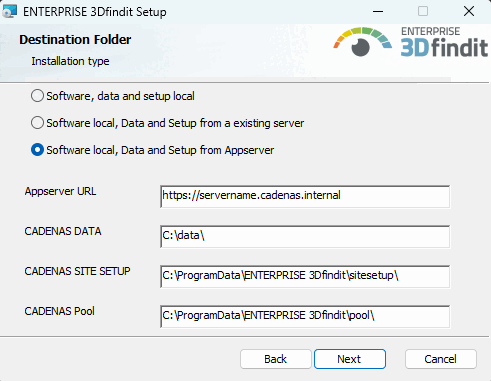
Dossier de destination [Destination Folder]
Choisissez l'une des trois options suivantes :
Logiciel, données et setup en local [Software, data and setup locally]: cette option pourrait par exemple être utilisée pour une installation purement individuelle ou pour une installation sur serveur. Adaptez les chemins d'installation de CADENAS DATA, CADENAS SITE SETUP et CADENAS Pool si nécessaire.
Exemple le
start.env: Le chemin sous CADENAS_DATA a été modifiée.[ENVIRONS] CADENAS=%DirOfThisFile% CADENAS_SETUP=C:\ProgramData\PARTsolutions\setup CADENAS_DEFAULTUSER=$CADENAS_SETUP\user\default_user CADENAS_SITESETUP=C:\ProgramData\PARTsolutions\sitesetup CADENAS_USER=%UserAppData%\PARTsolutions\user CADENAS_LICENSE=$CADENAS_SITESETUP\lic CADENAS_POOL=C:\ProgramData\PARTsolutions\pool CADENAS_DATA=C:\data\
Logiciel local, données et setup d'un serveur existant [Software Local, data and setup from an existing server]: Si une installation serveur a été effectuée et que les répertoires CADENAS_DATA et CADENAS_SETUP y ont été partagés, il est possible d'installer un client dans lequel le logiciel se trouve en local, mais où l'on fait référence aux autres répertoires.
Logiciel Local, données et installation à partir du serveur d'applications [Software Local, data and setup from the app server]: Utilisez cette option pour une installation client.
CADENAS_DATA et CADENAS_SETUP sont configurés via le serveur d'applications, il suffit donc de saisir l' URL du serveur d'applications. Adaptez le chemin d'installation de CADENAS Pool si nécessaire.
Vous trouverez des explications sur différents cas d'utilisation sur Section 4.5.1, « Différents scénarios d'installation ».
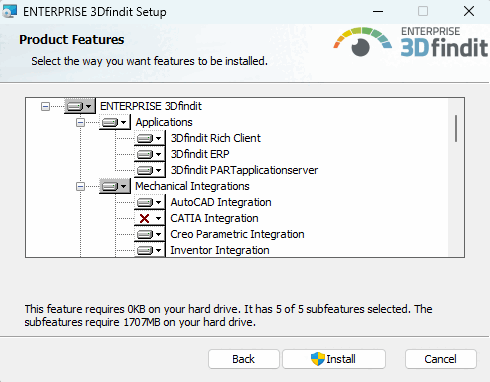
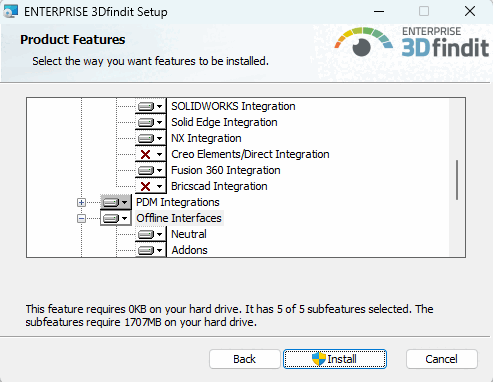
Sélectionnez les fonctionnalités souhaitées pour votre installation.
Ce paquet contient toujours aussi les paquets 3Dfindit PARTapplicationserver et 3Dfindit ERP.
Remarque Les pilotes JDBC spéciaux pour MSSQL et Oracle ne sont PAS fournis dans le cadre de l'installation d'ENTERPRISE 3Dfindit, mais doivent être téléchargés depuis les sites web correspondants :
https://www.oracle.com/database/technologies/appdev/jdbc-downloads.html
sqljdbc_12.2\deu\mssql-jdbc-12.2.0.jre8.jarou.sqljdbc_12.2\deu\mssql-jdbc-12.2.0.jre11.jarhttps://learn.microsoft.com/de-de/sql/connect/jdbc/download-microsoft-jdbc-driver-for-sql-server?view=sql-server-ver16
Vous trouverez des informations détaillées dans le manuel d'administration ENTERPRISE 3Dfindit sous Connexion à la base de données.
Toutes les applications ENTERPRISE 3Dfindit sont incluses, notamment 3Dfindit et PARTadmin, mais aussi PARTlinkManager, PARTdataCenter, etc.
Pour la fonctionnalité de base d'un client ENTERPRISE 3Dfindit pur, il n'est pas nécessaire d'installer ce point ni PARTsolutions Appserver et PARTsolutions ERP. (Voir aussi à ce sujet Section 4.5.1, « Différents scénarios d'installation ».)
Est explicitement nécessaire lors de la mise en place du serveur d'application lui-même. L'option 3Dfindit Rich Client n'est pas absolument nécessaire dans ce cas, car PARTadmin est déjà inclus dans l'option 3Dfindit PARTapplicationserver.
En outre, PARTapplicationserver est explicitement utilisé dans le cas d'une installation monoposte avec 3Dfindit.
Vous trouverez des détails sur l'installation de PARTapplicationserver sur Section 4.5.3, « Installation de PARTapplicationServer ».
Avec la gestion professionnelle des pièces avec intégration PDM/ERP/PLM[1] ce package est en principe nécessaire. Il fait donc également partie intégrante du package 3Dfindit Rich Client. Il est alors installé, par exemple, PARTlinkManager.
La sélection explicite de ce seul paquet est éventuellement utile si PARTlinkManager doit être installé spécialement sur un client.
Vous trouverez des informations de base sur la connexion de la base de données des liens et l'activation de l'intégration ERP plus loin sur Section 4.5.2, « ENTERPRISE 3Dfindit Intégration ERP ».
Activez les intégrations que vous avez achetées.
Activez les intégrations que vous avez achetées.
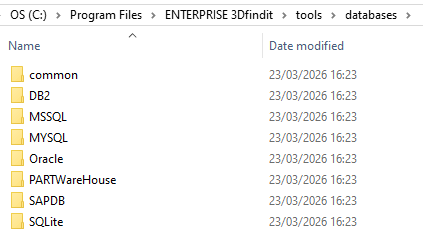
Outils: Contient des scripts de base de données nécessaires à la mise en place de l'environnement ERP et des fichiers vbs pour des tâches spécifiques.
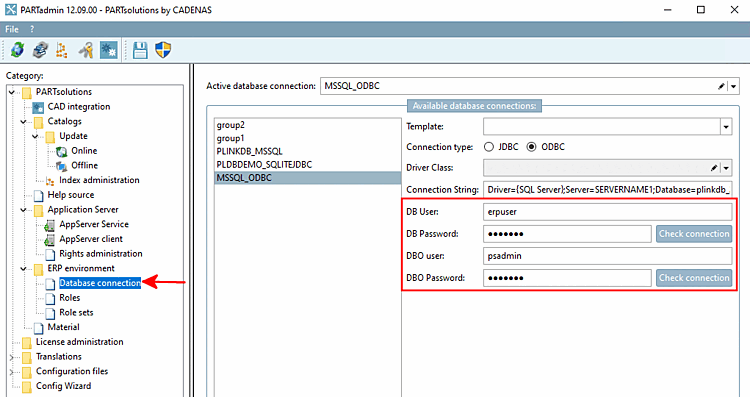
Au moyen des scripts, vous pouvez également définir des droits différents pour l'utilisateur standard ("erpuser") et l'utilisateur admin ("psadmin").
CREATE USER IF NOT EXISTS 'erpuser' IDENTIFIED WITH mysql_native_password BY 'erpuser';

GRANT SELECT, INSERT, UPDATE, DELETE ON partlinkdb.ERPTABLE to erpuser;
GRANT SELECT, INSERT, UPDATE, DELETE ON partlinkdb.LINKTABLE to erpuser;
GRANT SELECT, INSERT, UPDATE, DELETE ON partlinkdb.CLASSFOLDERTABLE to erpuser;
GRANT SELECT, INSERT, UPDATE, DELETE ON partlinkdb.CLASSTABLE to erpuser;
GRANT SELECT, INSERT, UPDATE, DELETE ON partlinkdb.PRJTABLE to erpuser;
GRANT SELECT, INSERT, UPDATE, DELETE ON partlinkdb.PLMTABLE2 to erpuser;
GRANT SELECT, INSERT, UPDATE, DELETE ON partlinkdb.PLM_HIERARCHY to erpuser;
GRANT SELECT, INSERT, UPDATE, DELETE ON partlinkdb.CNSSEQ to erpuser;
GRANT SELECT, INSERT, UPDATE, DELETE ON partlinkdb.TREETABLE to erpuser;
GRANT SELECT, INSERT, UPDATE, DELETE ON partlinkdb.LOGTABLE to erpuser;
GRANT SELECT, INSERT, UPDATE, DELETE ON partlinkdb.EXPORTTABLE to erpuser;
Der Admin muss auch Spalten-Definitionen in der ERPTABLE ändern können.
CREATE USER IF NOT EXISTS 'psadmin' IDENTIFIED WITH mysql_native_password BY 'psadmin';

GRANT ALTER, SELECT, INSERT, UPDATE, DELETE ON partlinkdb.ERPTABLE to psadmin;
GRANT SELECT, INSERT, UPDATE, DELETE ON partlinkdb.LINKTABLE to psadmin;
GRANT SELECT, INSERT, UPDATE, DELETE ON partlinkdb.CLASSFOLDERTABLE to psadmin;
GRANT SELECT, INSERT, UPDATE, DELETE ON partlinkdb.CLASSTABLE to psadmin;
GRANT SELECT, INSERT, UPDATE, DELETE ON partlinkdb.PRJTABLE to psadmin;
GRANT SELECT, INSERT, UPDATE, DELETE ON partlinkdb.PLMTABLE2 to psadmin;
GRANT SELECT, INSERT, UPDATE, DELETE ON partlinkdb.PLM_HIERARCHY to psadmin;
GRANT SELECT, INSERT, UPDATE, DELETE ON partlinkdb.CNSSEQ to psadmin;
GRANT SELECT, INSERT, UPDATE, DELETE ON partlinkdb.TREETABLE to psadmin;
GRANT SELECT, INSERT, UPDATE, DELETE ON partlinkdb.LOGTABLE to psadmin;
GRANT SELECT, INSERT, UPDATE, DELETE ON partlinkdb.EXPORTTABLE to psadmin;
Dans PARTadmin, sous Connexion à la base de données [Database connection], la connexion peut être vérifiée.
Vous trouverez des détails sur tous les systèmes dans les fichiers Readme des différents répertoires.
Activer les interfaces sur le client: Par défaut, l'option est activée. Si vous désactivez l'option, vous devrez activer manuellement les interfaces souhaitées plus tard dans PARTadmin sous la catégorie Intégration CAO [CAD integration]. Voir aussi Section 1.4.2, « Intégration de la CAO » in ENTERPRISE 3Dfindit (Professional) - Administration.
Sous
...\software\install\scriptsScripts batch qui peuvent être exécutés localement à tout moment pour activer/désactiver toutes les interfaces. Il peut s’agir également utilisé administrativement dans le cadre d’une distribution de logiciels avec déploiement devenir.
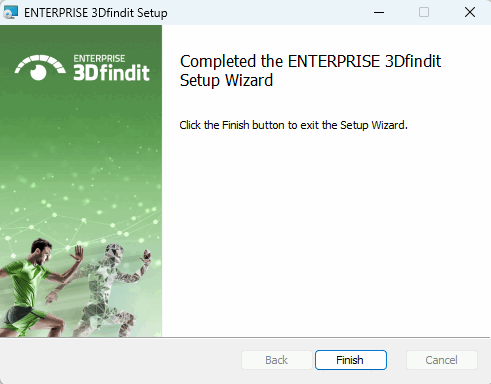
Dès que l'installation est terminée, le message suivant apparaît. Cliquez sur .
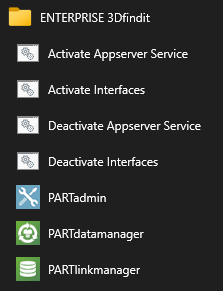
Une fois l'installation terminée, les éléments correspondants du menu de démarrage s'affichent. Les liens Activate Interfaces / Deactivate Interfaces démarrent les scripts batch mentionnés ci-dessus.
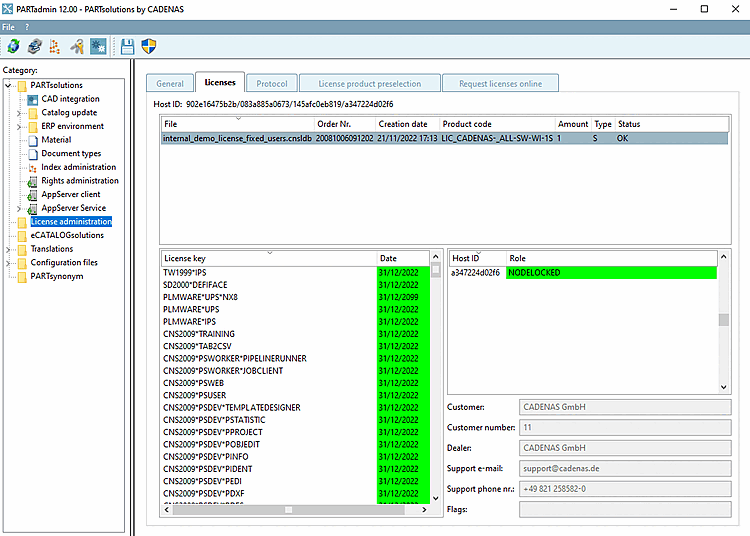
Importez une licence déjà reçue (qui contient aussi le PARTapplicationServer) via PARTadmin sous l'onglet Licences [Licenses] > Ajouter un fichier... [Add file...] pour l'installer :
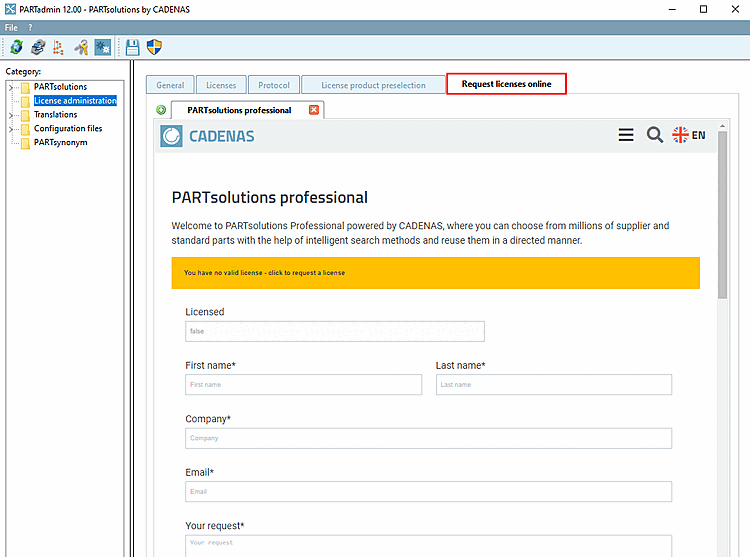
Sinon, faites une demande de licence sur la page d'onglet Demander des licences en ligne [Request licenses online].
Vous trouverez des détails sur les licences sur le site Section 9.3, « Licence ».
Installez les catalogues et les classifications dont vous avez besoin via PARTadmin.
Pour plus de détails, voir Section 1.4.3.1, « Mise à jour du catalogue en ligne » in ENTERPRISE 3Dfindit (Professional) - Administration.
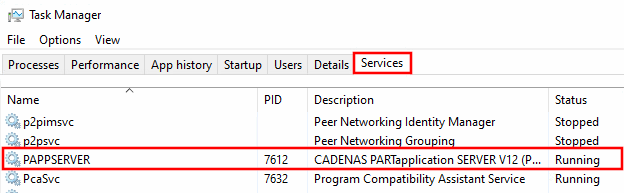
Chaque fois qu'un PARTapplicationServer central est utilisé, celui-ci doit être démarré en tant que service.
Pour ce faire, cliquez sur l'entrée Activate Appserver Service dans le menu de démarrage.
Dans le gestionnaire de tâches, sous Services, vérifiez si l'entrée PAPPSERVER est présente et si son statut est Running.


![Catégorie "Intégration CAO [CAD integration] Intégration de la CAO](https://webapi.partcommunity.com/service/help/latest/pages/fr/partsolutions_user/doc/resources/img/img_602caac119ee46639ed43a7a33228704.png)
![PARTadmin > Mise à jour du catalogue [Catalog update] > En ligne [Online]](https://webapi.partcommunity.com/service/help/latest/pages/fr/partsolutions_user/doc/resources/img/img_78a95bd1fc0d4ae3a9a56313e2afe1b9.png)

En plus des indications du présent chapitre, veuillez impérativement tenir compte des remarques sous Section 5.24, « Remarques importantes sur la mise à jour à la V12 » in ENTERPRISE 3Dfindit (Professional) - Administration.
[1] La gestion des pièces avec l'intégration PDM/ERP/PLM est le lien entre les données du catalogue et vos données dans le système ERP/PLM. Cela permet de contrôler les validations et les vues en fonction des rôles et d'afficher les données de votre système de base de données dans PARTsolutions pour l'utilisateur. Le système de base de données doit être fourni par le client.