Chapitre 2. Formation - Création d'un écrou à chapeau
2.3. Définir des variables dans le gestionnaire de variables
|  |
| Précédent | Suivant |
Créez les variables nécessaires avec les valeurs correspondantes. Voir à ce sujet Fig. „Écrou borgne Dessin“ et Fig. „Écrou borgne Tableau“.
![[Remarque]](https://webapi.partcommunity.com/service/help/latest/pages/fr/partsolutions_user/doc/images/note.png) | Remarque |
|---|---|
Les variables peuvent également être créées automatiquement au cours d'une importation CSV. Voir Section 2.5, « Importer des données de tableau par CSV ». | |
Nom [Name]: sous Nom [Name], saisissez le nom de la variable.
Description: Comme le nom de la variable est limité à 10 caractères, vous pouvez ajouter un texte descriptif à la variable dans le champ Description.
Emplacement [Save location]: Sélectionnez Dans la géométrie et le tableau [In geometry and table].
Avec ce choix, les variables sont enregistrées à la fois dans le fichier 3db et dans le fichier tab/tac.
Vous trouverez des informations détaillées à ce sujet dans Section 7.8.11, « Emplacement: Dans la géométrie uniquement | Dans le tableau uniquement | Dans la géométrie et le tableau » in eCATALOG 3Dfindit.
Type de données [Data type]: Laissez la présélection Nombre décimal [Decimal number].
Identification du type [Identification type]: laisser la présélection Caractéristique géométrique [Geometry attribute].
Statut [Status]: laissez la présélection Variable avec des valeurs fixes [Variable with fixed values].
La formule [Equation]: Saisissez une valeur de variable (par exemple, pour la variable DG, la valeur 4).
Lorsque toutes les données relatives à la variable ont été saisies, confirmez en cliquant sur le bouton .
-> La variable est ajoutée à la liste au-dessus.
-> La variable est immédiatement affichée dans le tableau.
Effectuer des modifications: sélectionner la variable souhaitée, la modifier et confirmer en cliquant sur .
Cliquez sur
 pour créer une nouvelle ligne à la fois.
Procédez de la manière décrite pour créer toutes les variables nécessaires.
L'illustration suivante montre le gestionnaire de variables [Variable Manager] avec les variables nécessaires et le tableau [Table] à 1 ligne.
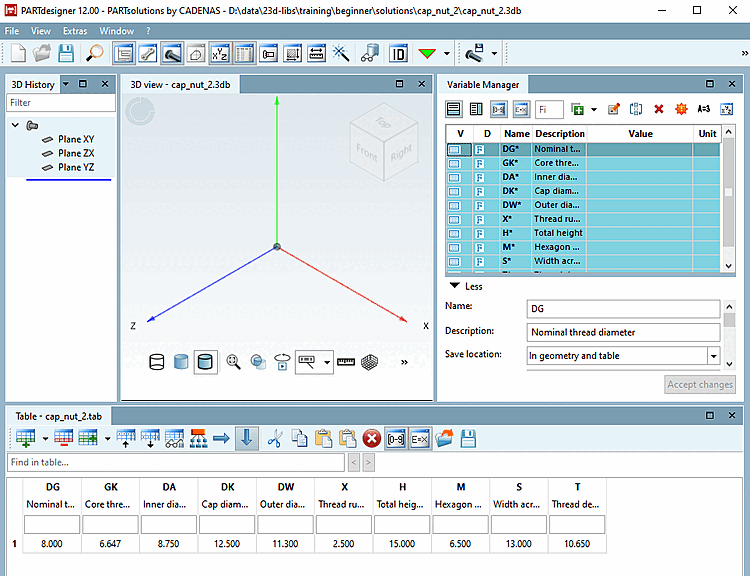
Les variables ont été saisies : Les variables marquées pour être utilisées dans la géométrie et le tableau, mais qui n'ont pas encore été utilisées dans la géométrie, sont marquées d'un astérisque.
| Remarque |
|---|---|
Vous trouverez l'essentiel de l'utilisation sous Section 7.8.1, « Gestionnaire de variables - L'essentiel en un coup d'œil » in eCATALOG 3Dfindit coup d'œil. Vous trouverez des détails sur les différents paramètres sous Section 7.8.10, « Gestionnaire de variables - Les différents paramètres » in eCATALOG 3Dfindit. | |