5.12.3. Informazioni generali sulle classificazioni
5.12.3.8. Classificazione (paese fornitore )
|  |
| Indietro | Avanti |
Se un catalogo è stato classificato in base ai Paesi fornitori (ad es. "Schiedel"), è possibile filtrarlo in PARTdataManager / 3Dfindit. A seconda della selezione, la visualizzazione nella struttura ad albero (e nella tabella) cambia.

![PARTdataManager: Consegna del paese [Delivery country]](https://webapi.partcommunity.com/service/help/latest/pages/it/installation_ecatalogsolutions/doc/resources/img/img_7f9b2a111a6e4cb1ad9e631023958029.png)
In PARTdataManager, il filtro Paese di consegna [Delivery country] può essere attivato e disattivato nel menu contestuale delle barre degli strumenti.
Per poter utilizzare la funzionalità, è necessario installare la classificazione Delivery Countries.

Di seguito viene descritto come classificare i progetti di conseguenza. Opzionalmente, è possibile classificare non solo i progetti stessi, ma anche le loro singole linee.
In Impostazioni [Settings], selezionare la pagina della scheda Classificazione [Classification].
Selezionare la scheda Paesi di consegna.
Fare doppio clic su un Paese desiderato nell'area di dialogo del sistema di classi [Class system].
-> La voce corrispondente si trova alla voce Classi selezionate [Selected classes].
Fare doppio clic su qualsiasi altro Paese per aggiungerlo alla voce Classi selezionate [Selected classes].
Opzionale: è possibile specificare la classificazione anche per le singole linee di progetto. Il prerequisito è che venga creata una variabile aggiuntiva nella tabella degli attributi delle caratteristiche (nell'esempio seguente "DC") e che vengano inserite come valore le abbreviazioni dei Paesi corrispondenti.
Nella finestra di dialogo Classificazione [Classification], inserire la seguente funzione nella colonna Condizione [Condition].
INLIST(Variable,Wert)
Variabile è la variabile della tabella in cui vengono inserite le abbreviazioni dei paesi; valore è l'abbreviazione del paese corrispondente.
Come nell'esempio precedente, una voce sarebbe INLIST(DC,'DE'), ad esempio.
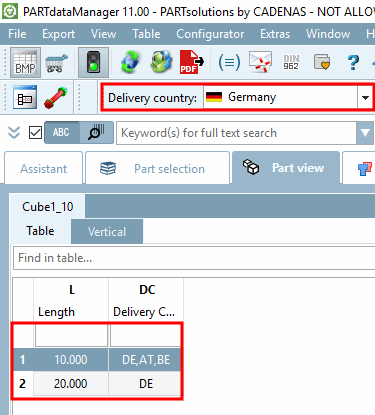
Figura 5.931. Esempio: se si seleziona "Argentina" come Paese, vengono visualizzate tutte le righe della tabella. Se si seleziona "Germania", vengono visualizzate solo le righe della tabella con il valore "DE" nella colonna "DC".
Nel supporto di output (PARTdataManager, PARTcommunity), solo le celle della tabella per le quali è stata inserita l'abbreviazione appropriata del Paese verranno visualizzate in seguito in base al Paese di consegna impostato.
Infine, è necessario impostare l'indice di visualizzazione Aggiorna
 . Successivamente, è possibile testare la funzione in PARTdataManager . Vedi sopra
Figura 5.927, “PARTdataManager: Consegna del paese [Delivery country]
”.
. Successivamente, è possibile testare la funzione in PARTdataManager . Vedi sopra
Figura 5.927, “PARTdataManager: Consegna del paese [Delivery country]
”.
![Classi selezionate [Selected classes]: Germania, Austria, Belgio](https://webapi.partcommunity.com/service/help/latest/pages/it/installation_ecatalogsolutions/doc/resources/img/img_cab98a6845b444668ddeeeb22564a9a4.png)

![[Nota]](https://webapi.partcommunity.com/service/help/latest/pages/it/installation_ecatalogsolutions/doc/images/note.png)

![[Importante]](https://webapi.partcommunity.com/service/help/latest/pages/it/installation_ecatalogsolutions/doc/images/important.png)
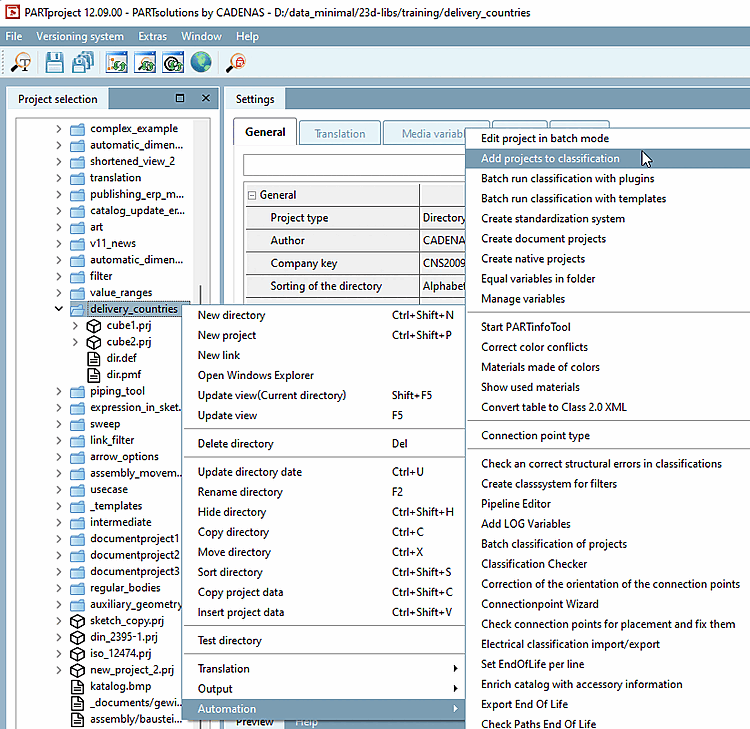
Sulla base di un progetto già classificato, è possibile aggiungere alla classe qualsiasi altro progetto al di sotto di una specifica directory in modalità batch.
Selezionate una directory ai cui progetti volete trasferire la classificazione e fate clic sul comando del menu contestuale Aggiungi progetti alla classificazione [Add projects to classification] sotto Automazione [Automation].
Selezionare l'opzione Paesi di consegna nel campo elenco sotto Classificazione [Classification].
Attivare la casella di controllo sotto Input.
Fare clic sul pulsante e selezionare il progetto desiderato nella finestra Explorer. (La voce corrispondente viene visualizzata in Input ).
-> Si apre l'area di dialogo Caratteristiche [Attributes].
Rimuovere l'attivazione in corrispondenza di Imposta caratteristiche [Set attribute] e fare clic su .
-> Riceverete la conferma di quali progetti sono stati aggiunti alla classe.
Aprire i progetti da testare in PARTdataManager.
Visualizzazione nella tabella:
Visualizzazione nell'albero degli indici:


![Paese di consegna [Delivery country] "Germania": albero degli indici](https://webapi.partcommunity.com/service/help/latest/pages/it/installation_ecatalogsolutions/doc/resources/img/img_f63e80abb2c840b1bfb966dbbea5c1ff.png)
![Paese di consegna [Delivery country] "Belgio": albero degli indici ampliato](https://webapi.partcommunity.com/service/help/latest/pages/it/installation_ecatalogsolutions/doc/resources/img/img_9f4620fd8a11460b8f95a4d253380c13.png)