1.6. Riferimento completo al CAD di tutti i comandi del menu
1.6.4.
Inserire il modello (2D) dalla libreria di parti standard e acquistate
|  |
| Indietro | Avanti |

Di seguito viene descritto come inserire nel sistema CAD i singoli pezzi 2D della libreria di pezzi standard e acquistati [Standard and supplier parts library].
Nel menu 3Dfindit, fare clic su
 Inserisci
modello [Insert model]. [12]
Inserisci
modello [Insert model]. [12]
Selezionare il componente desiderato nella selezione dei pezzi [Part selection]. [13]
Specificare la caratteristica desiderata nella vista dei pezzi [Part view].
Creazione della derivazione 2D [2D derivation]
Sono disponibili le seguenti opzioni:
Fare clic sul pulsante Derivazione 2D [2D derivation]
 .
.
-> Si apre la finestra di aggancio della derivazione 2D [2D derivation].
Selezionare una vista.[14]
In alternativa, puoi Richiamo della vista 2D [2D view] e vai direttamente al CAD Trasferisci [Transfer to CAD]
 clic.
clic.
Si apre [Choose view to pass...] quindi la finestra di dialogo Seleziona la vista da trasferire.... [Choose view to pass...]
Selezionare la vista desiderata.
Nella finestra di dialogo Seleziona vista da trasferire [Choose view to pass...] sono disponibili le seguenti viste... finestra di dialogo:
Clicca sul pulsante
(opzione a) o confermare con (opzione b)È possibile utilizzare
[15]-> La vista torna alla
Sistema CAD.
Inserire il componente o l'assieme utilizzando il metodo di posizionamento del sistema CAD.
![PARTdataManager - Selezione delle parti [Part selection]](https://webapi.partcommunity.com/service/help/latest/pages/it/partsolutions_user/doc/resources/img/img_4dc9a7dc09a540e08ba3d77a15ac937c.png)
![PARTdataManager - Vista delle parti [Part view]](https://webapi.partcommunity.com/service/help/latest/pages/it/partsolutions_user/doc/resources/img/img_3ecec5f202ab4e88a31ebe35ecb29aef.png)
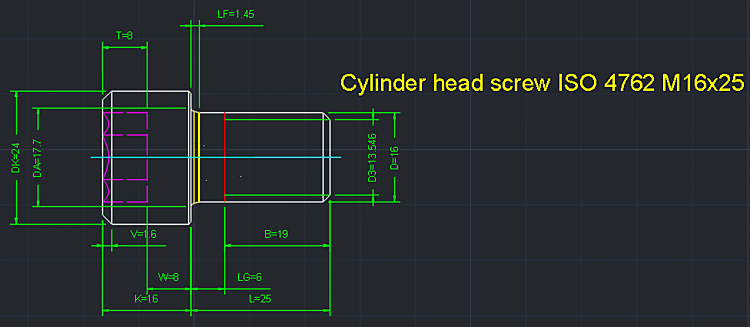
![PARTdataManager - Vista 2D [2D view]](https://webapi.partcommunity.com/service/help/latest/pages/it/partsolutions_user/doc/resources/img/img_7a8b17e447d94927a6239e87a7c8680e.png)
![Selezionare la vista da trasferire [Choose view to pass...]...](https://webapi.partcommunity.com/service/help/latest/pages/it/partsolutions_user/doc/resources/img/img_a52145a111ca446f9fb60735556650ac.png)
![[Nota]](https://webapi.partcommunity.com/service/help/latest/pages/it/partsolutions_user/doc/images/note.png)
![PARTdataManager -> Menu Extra [Extras] -> Impostazioni [Settings...]...](https://webapi.partcommunity.com/service/help/latest/pages/it/partsolutions_user/doc/resources/img/img_93f694d873244a2f991a6b44dc97e249.png)
[12] Con AutoCAD, ad esempio, Inserisci per impostazione predefinita modello [Insert model] visualizzato. Sia che venga utilizzato in modalità CAD 2D o 3D dipende dal fatto che la derivata 2D sia stata precedentemente creata in PSOL Divenne. La configurazione può essere utilizzata per passare alla visualizzazione dei pulsanti su Inserisci 2D [Insert 2D].
Notare anche l'impostazione sotto PARTdataManager -> Menu Extra [Extras] -> Impostazioni... [Settings...] -> Trasferisci su CAD. [Export to CAD]
[13] Una descrizione dettagliata del PARTdataManager è disponibile in Sezione 2.1, “ Gestore dei dati delle parti ”.
[14] Per informazioni dettagliate sulla vista 2D, consultare la sezione Sezione 2.1.10, “ Creare una derivazione 2D ”.
[15] anche Esporta Esporta su file [Export in file]. Per informazioni dettagliate, vedere Sezione 2.1.9, “ Esportazione in vari formati di file (senza interfaccia 3Dfindit) ”.