
All assigned or all existing users and groups from all trusted domains/forests are listed on the Rights assignment [Assign rights] Tabbed page.

![[Note]](https://webapi.partcommunity.com/service/help/latest/pages/en/ecatalogsolutions/doc/images/note.png)
![[Tip]](https://webapi.partcommunity.com/service/help/latest/pages/en/ecatalogsolutions/doc/images/tip.png)

By default, a logged-in user can see, control and delete their own pipelines, create and delete their own analyses and see all analyses; 3DfindIt User should also be activated by default. Otherwise there is no access to 3DfindIt. See also below.
!["Rights assignment [Assign rights]" Tabbed page (only assigned [only assigned] )](https://webapi.partcommunity.com/service/help/latest/pages/en/ecatalogsolutions/doc/resources/img/img_1035a2e40fb94d57aaa8c26ed6f5043c.png)
If you want a special user or a special group to have extended rights, proceed as follows:
!["Rights assignment [Assign rights]" Tabbed page ( all available [all existing] )](https://webapi.partcommunity.com/service/help/latest/pages/en/ecatalogsolutions/doc/resources/img/img_170a3dc6a5fa4812a1cc1c85f2a16e7f.png)
In principle, the following applies:
Click on the Check authentication [Check authentification...] dialog box opens.... [Check authentification...]
![Check authentication... [Check authentification...]](https://webapi.partcommunity.com/service/help/latest/pages/en/ecatalogsolutions/doc/resources/img/img_d27c70d462dd4dc7bbb3475ea064e4da.png)
Enter your user name [Username] and password [Password].
Click on to load all user data and rights.
By clicking on Log in [Login], you can check whether the Windows login is correct. If the entry is incorrect, the evaluation is empty. Entering the password is optional.
![Check authentication. [Check authentification...]..: Incorrect password](https://webapi.partcommunity.com/service/help/latest/pages/en/ecatalogsolutions/doc/resources/img/img_0835b6ded0d14027b9c02bb954cffa71.png)
When using 3dfindit, at least 3Dfindit User must be activated in PARTadmin under Profiles for the authorized users and groups; otherwise there is no access to 3Dfindit.
May list all 3Dfindit users and all active sessions.
Can see the user assignments in the PARTapplicationServer dashboard.
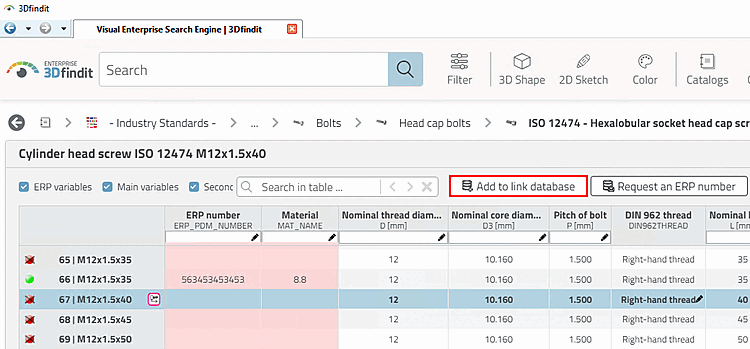
If the function Add [Add to link database] to link database [Add to link database] (also variants) is to be executable in 3Dfindit, the profile LinkDb user. Can add parts to link database. (linkdb-user) must be activated.
If existing data records are to be edited, the profile LinkDb administrator. Can add/modify/delete data in link database (linkdb-admin) must be activated.
Deny Access to 3Dfindit (3dfindit-nonuser)
If you want to lock out specific users or groups from 3Dfindit, you can assign this profile to take away their usage rights - even if another configuration says that the user is a 3Dfindit user.
CNS\CNS_AGB => 3dfindit-user
CNS\specific_user => 3dfind-nonuser
Alle AGB-User sind erlaubt - aber der spezifische User ist nicht erlaubt.
The setting is therefore required if you want to deny access to certain groups or users, despite the fact that other groups or * allow it.


To view the rights in detail, switch to the Rights tabbed page.
In a client-server environment, the tabbed page Rights assignment [Assign rights] also controls which categories are to be displayed in PARTadmin on clients in the Category dialog area.
There is always full access to the category structure [Category] on the server.

![[Important]](https://webapi.partcommunity.com/service/help/latest/pages/en/ecatalogsolutions/doc/images/important.png)
If you want to carry out the configuration on a client, make sure that you are logged in with a user who has admin rights, as this is the only way to access the Application Server > Rights management [Rights administration] menu item.
In standard admin mode, the complete category structure [Category] is displayed.
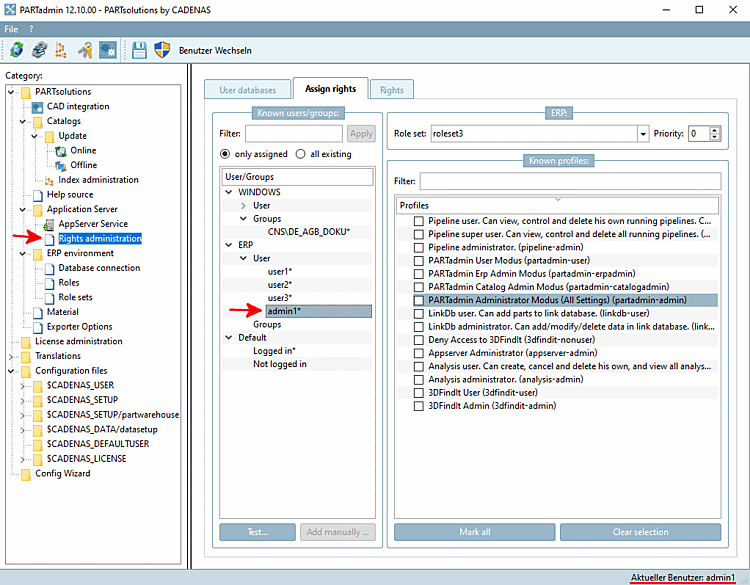
In the category structure [Category] under Application Server, select Rights management [Rights administration].
In the Known users/groups dialog area, select the desired user or group (here in the example "admin1").
If the admin mode is to be activated, either activate the profile PARTadmin Administrator Mode (All Settings) (partadmin-admin) in the Known Profiles [Known profiles] dialog area or leave ALL options deactivated (which corresponds to activating all options [see following figure]).

In the category structure [Category] under Application Server, select Rights management [Rights administration].
Select the desired user or group in the Known users/groups dialog area.
Activate the PARTadmin user mode (partadmin-user) profile in the Known profiles dialog area. The other profiles starting with "PARTadmin" must be deactivated.
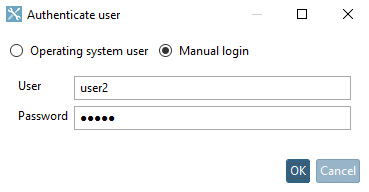
If you want to check the setting, switch to a client (if you are not already).
→ The Authenticate user dialog box opens.
Log in with the configured user and check the display in the category structure [Category].
→ Only the categories CAD integration and configuration files [Configuration files] > $CADENAS_USER are displayed.


In the category structure [Category] under Application Server, select Rights management [Rights administration].
Select the desired user or group in the Known users/groups dialog area.
Activate the PARTadmin Erp Admin Mode (partadmin-erpadmin) profile in the Known Profiles [Known profiles] dialog area.
If you want to check the setting, switch to a client (if you are not already).
→ The Authenticate user dialog box opens.
Log in with the configured user and check the display in the category structure [Category].
→ Only the categories ERP environment and configuration files [Configuration files] > $CADENAS_USER are displayed.


![Category tree with category "ERP environment [ERP environment]"](https://webapi.partcommunity.com/service/help/latest/pages/en/ecatalogsolutions/doc/resources/img/img_f3d4b8b1ab5445f5b542d7ce9e0cbaa1.png)
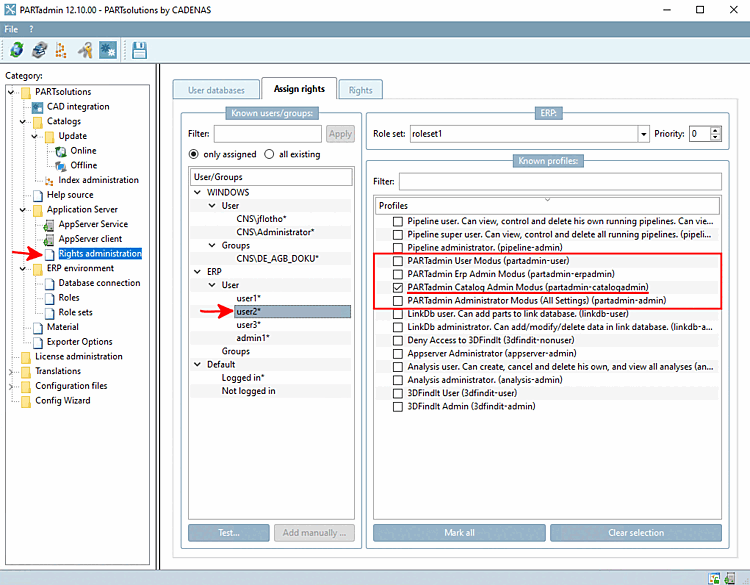
In the category structure [Category] under Application Server, select Rights management [Rights administration].
Select the desired user or group in the Known users/groups dialog area.
Activate the PARTadmin Catalog Admin Mode (partadmin-catalogadmin) profile in the Known Profiles [Known profiles] dialog area.
If you want to check the setting, switch to a client (if you are not already).
→ The Authenticate user dialog box opens.
Log in with the configured user and check the display in the category structure [Category].
→ Only the categories Catalogs and Configuration files > $CADENAS_USER are displayed.
![Category tree with category "Catalogs [Catalogs]"](https://webapi.partcommunity.com/service/help/latest/pages/en/ecatalogsolutions/doc/resources/img/img_b13aca66b824428e881d793b65e400cf.png)
The following applies to access to PARTlinkManager:
Anyone can use PARTlinkManager on the server and therefore has the right to read, change and write entries.
On clients, only users with the linkdb-linkmanager right or the linkdb-admin profile have these rights.
The system checks whether this right exists when you log in. If not, the following message appears:
You need the right 'linkdb-linkmanager' or the profile 'linkdb-admin' to use this application.
