5.7.4.
Role sets
5.7.4.1.
Mapping Role set - Roles / plinkusers.cfg ->
[<Role name>] -> Key "GROUPS"
|  |
| Prev | Next |
The central element is the assignment of roles to role records. The assigned roles are displayed in PARTdataManager
/3Dfindit when calling authenticate/change user [Authenticate/switch users]
 or Select group
 are offered for selection.
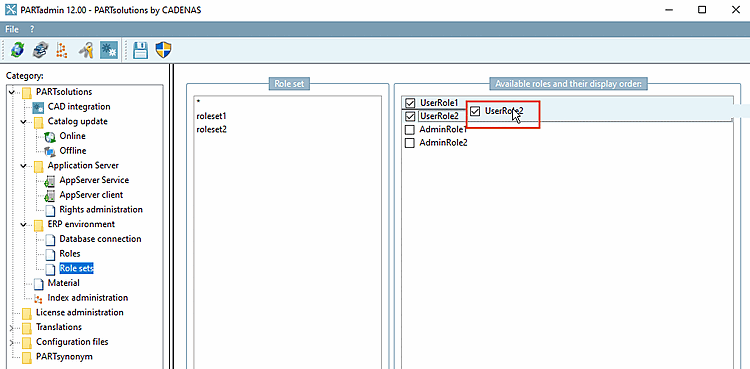
At least one role is assigned to each role set [Role set] in PARTadmin in the dialog area Available roles and their display sequence [Available roles and their display order].
![Category "Roll sets [Role sets] "](https://webapi.partcommunity.com/service/help/latest/pages/en/partsolutions_admin/doc/resources/img/img_3e35a7cfdcdc4bcbb9b98dab51983467.png)
![[Note]](https://webapi.partcommunity.com/service/help/latest/pages/en/partsolutions_admin/doc/images/note.png)
If several roles have been assigned to a role set, the following opens in PARTdataManager
authenticate/change user [Authenticate/switch users]
or Select group
the Select role dialog box opens.[70]
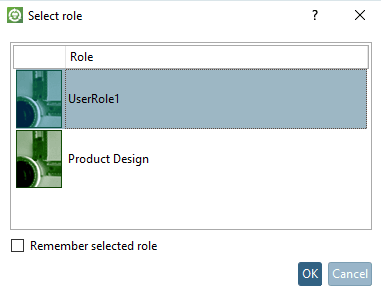
The order of the roles in the Select role dialog box corresponds to the order in the dialog under Available roles and their display order.
You can change the order of the displayed roles, if needed.
Select the roll and move it to the desired position by holding down the mouse button.
Control role selection via system variable
The role selection can also be controlled via a system variable. The desired role is then automatically selected during the login process, regardless of whether the user is configured as valid for this role or has several roles to choose from.
Setting via user interface: PARTadmin -> ERP environment -> User role assignment [User-Role assignment]
In order to assign roles to a user select the desired user and activate the respective checkboxes.
The selection is saved under $CADENAS_SETUP/plinkusers.cfg in the GROUPS key.
[ecat]
GROUPS="ECATALL","ECAT1","ECAT2","ECAT3","ECAT4","ECAT5","ECAT6"
GROUPORDER="DUMMY","ECATALL","ECAT1","ECAT2","ECAT3","ECAT4","ECAT5","ECAT6","LOC1",...
[70] You can find out how to set the image and the description text under Section 5.7.5.1.1, “ Dialog box for role selection - plinkgroups.cfg -> Block [Role name] -> Keys "DESC" and "IMAGE" ”.