
The PARTrenderManager allows you to create images centrally on a server with Maxwell Renderer, so that they can be accessed from different workstations.
Server and Client application are combined in one program. The first transfer parameter ("-server" or "-client") defines the program's functionality.
For the server a directory is needed, where the temporary files are stored. This directory has to be declared by a global variable with the name "PRM_TEMP"!
The client saves and loads some data from the configuration file
prendermanager.cfg, which should be located in the directory "$CADENAS_USER". If this file is not available there at the first start, the program automatically creates a configuration file with predefined values.The program used for the image calculation (here the Maxwell Renderer), has to be already installed!
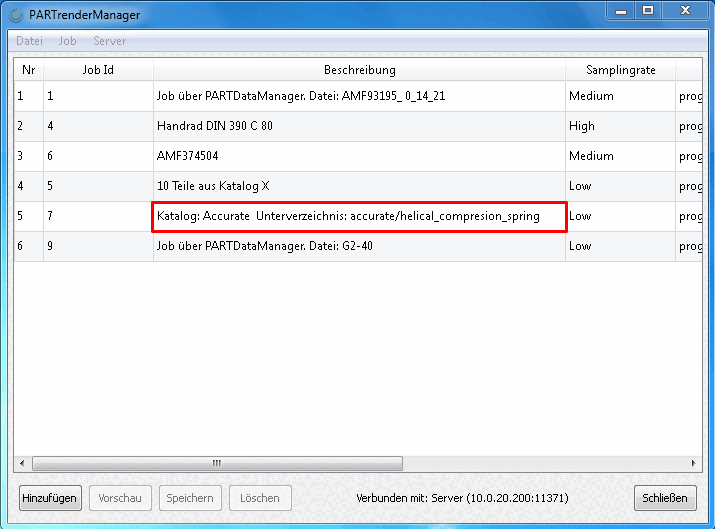
The user interface main component is a list, where all jobs of the currently connected server are displayed.

This list is updated automatically at regular intervals. Below the list there are several buttons with different functions such as creating and deleting jobs. These functions can also be called up in the Job [job] menu.

Furthermore beside the buttons information concerning the connected server or the file transfer are displayed.
The single orders from clients to the server are called "Jobs". These jobs contain the following data:
The jobs in the list are always transferred from the server and displayed in such a way that the jobs that have already been completed come first. They are followed by the job that is currently being processed by the server and finally the waiting jobs whose images have not yet been calculated. The index number numbers the entire list and only plays a role for the waiting jobs, as it can be used to change the sequence. The number can be changed by double-clicking and a job can be moved up in the list so that it is processed earlier by the server.
Index Job Users 7 job1 finished job of C 8 job2 finished job of C 9 job3 this job is currently processed by the server 10 job4 A 11 job5 A 12 job6 B 13 job7 A 14 job8 A 15 job9 A 16 job10 B In this example user A can move job9 maximally to index number 13, because job6 belongs to another user. Job5 can be moved maximally to the index number 10, because otherwise it would be higher than the currently processed job.
This number is used to identify the jobs and is assigned by the server to each new job that is sent by a client. The ID has no reference to the index or the sequence and cannot be changed once the job has been created.
The description helps users to understand and recognize the content of the jobs. By double-clicking on a description in the list, it can still be changed after the job has been created. However, this is only possible if the job has not yet been edited and belongs to the user.
The sampling rate determines the number of passes available to the renderer for calculating the images of a job. The higher this value, the more accurate the calculation and therefore the image. However, a high value also leads to a very long calculation time for each image. After creating a job, this value can also be changed by double-clicking. As with the description, however, there is also the restriction that the job in question belongs to the user and is still in the queue.
The status shows the user whether a job is still in the queue, is currently being processed by the server or whether the images have already been calculated. For completed jobs, the number of images is also displayed. The currently processed job also shows how many images have already been completed and the total number.
![[Important]](https://webapi.partcommunity.com/service/help/latest/pages/en/ecatalogsolutions/doc/images/important.png)
All available servers that have been loaded from the configuration file are displayed in the Server menu. The server to which the client is connected is marked separately. Clicking on one of the other servers will attempt to switch the connection to this server. If you want to add a new server to the list, simply click on the menu item Add server... [Add server..] and a new dialog will open. The necessary information (IP address, port and name) is entered in this dialog. The system automatically checks whether the server name is unique and does not match an existing server. A click on the button checks whether a connection to the server is possible. This test is carried out automatically before a server is added if the connection has not yet been checked. The new server can only be added to the list if the test is successful. You can also set whether the client should connect to the newly created server immediately. Once the server has been successfully created, its data is saved in the configuration file.
You can call up the PARTrenderManager in various ways:
via PARTdataManager -> Export menu -> Export to file [Export in file] -> Graphic formats -> Maxwell Render -> Maxwell Renderer tab page -> Render [Rendering] item -> Select Transfer to server
via PARTdataManager -> Context menu of a directory/project in the index tree -> Generate image data/preview images -> Maxwell Render -> Maxwell Renderer tab page -> Render [Rendering] item -> Select Transfer to server
More information is found under Section 2.1.9.3.3.6.2.4.3, “Create job via PARTdataManager using image data/generate preview images ”.
Jobs are added in the PARTrenderManager (Client) on the Create job [Create a job] dialog page.

Call up the Create job [Create a job] dialog page using the button.
Select the desired sampling rate in the list field.
Preview images of the different qualities are displayed to help you select the sampling rate.
At this value choose an adequate compromise between quality and needed creation time.
Once all the settings have been made, click on the button. The data is now sent to the server.
If the files are located in different folders they have to be added to the file list separately! When the finished images are resaved PARTrenderManager keeps the folder structure.
The job contains the following files:
C:/OrdnerA/Datei1.mxs
C:/OrdnerA/OrdnerA1/Datei2.mxs
C:/OrdnerB/Datei3.mxs
C:/OrdnerB/Datei4.mxs
If as target directory that path which all files have common (here in the example this would only be „C:/“) is set for the resaving, then the images are saved to their respective .mxs files.
C:/OrdnerA/Datei1.mxs
C:/OrdnerA/Datei1.bmp

C:/OrdnerA/OrdnerA1/Datei2.mxs
C:/OrdnerA/OrdnerA1/Datei2.bmp

C:/OrdnerB/Datei3.mxs
C:/OrdnerB/Datei3.bmp

C:/OrdnerB/Datei4.mxs
C:/OrdnerB/Datei4.bmp
If another target directory is set, then the folder structure is also kept (only the common path changes).
Target directory should be: D:/Pictures/
C:/Bilder/OrdnerA/Datei1.mxs
D:/Bilder/OrdnerA/Datei1.bmp

C:/Bilder/OrdnerA/OrdnerA1/Datei2.mxs
D:/Bilder/OrdnerA/OrdnerA1/Datei2.bmp

C:/Bilder/OrdnerB/Datei3.mxs
D:/Bilder/OrdnerB/Datei3.bmp

C:/Bilder/OrdnerB/Datei4.mxs
D:/Bilder/OrdnerB/Datei4.bmp
The mxs files are still under "C:/" (thus exactly in the origin paths), only the images are saved under "D:"!
Via Export to file [Export in file] (a single file), a job can be created directly from PARTdataManager to create a job and send it to the server.
Once a part has been loaded into the part view [Part view], start the export under the menu Export -> Export to file [Export in file] -> Graphic formats -> Maxwell Renderer.
-> The Export in Maxwell Render format dialog box opens.
Settings on the Export in Maxwell Render format dialog page:
A description on all other settings is found under Section 2.1.9.3.3, “Maxwell Render 3D ”.
-> After confirming with , the job is sent to the PARTrenderManager client and the PARTrenderManager dialog box opens. The job "commissioned" appears in the dialog box. The Create job [Create a job] dialog is not opened. The description is created automatically. The sampling rate can optionally be changed as long as the job is in the waiting loop, i.e. the job status is "Waiting ". The list of jobs can no longer be changed.


The *.mxs files are created and a job with the paths to all project files is generated and sent to the PARTrenderManager.
![[Note]](https://webapi.partcommunity.com/service/help/latest/pages/en/ecatalogsolutions/doc/images/note.png) | Note |
|---|---|
During the generation there are no previews available (neither the old ones, nor the new ones). [93] | |
If you had selected Start Renderer [Start renderer], the (new) preview images will be available again as soon as the renderer is finished.
If you selected Transfer to server, the new preview images are available when they have been downloaded from the server and saved back.
In the PARTrenderManager dialog window you can see under Description for which directory the preview images were created. When the job is finished, save them back to the corresponding directory or directories.
If you want to delete one or more jobs, select the relevant jobs in the list and click on the button.
Jobs from other users, which are also selected, will not be deleted.
When deleting the current job the following has to be regarded:
The renderer cannot be stopped by the server, i.e. the renderer ends the calculation of the current image in any case. If the job has been deleted in the meantime, the renderer does not start a new image of the current job (if one still needs to be calculated) and the next job in the queue is processed. It is therefore possible that the client's list does not contain a job that is currently being processed by the server.
It is possible to request the current status of the image as preview during the calculation:
For calling the preview image there are several ways:
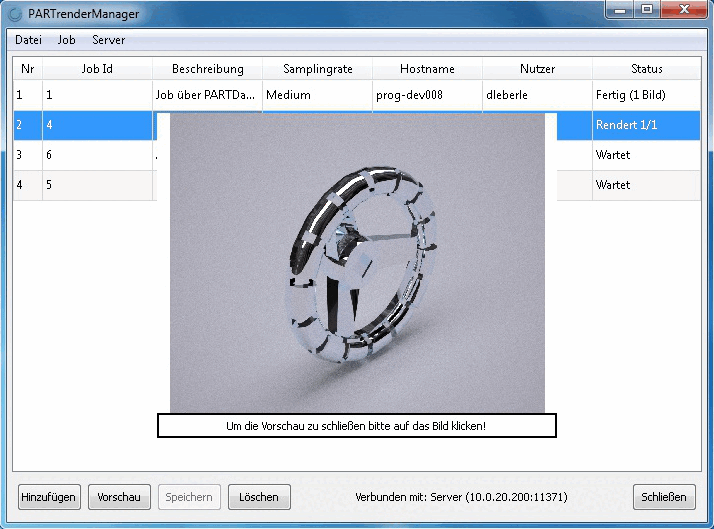
The preview image is displayed on the client and can be closed with a click on the image.
Once all the images of a job have been calculated by the renderer, the job is marked as finished and the images can be downloaded to the client's computer. To do this, simply select a job and click on Save images in the Job menu. Alternatively, you can also use the button below or the corresponding command in the context menu of a job line.
If the files from which the images were calculated originate from different folders, this folder structure is taken into account when saving the images.
In principle, each user only has the right to change or delete their own jobs. Even when re-sorting the waiting jobs, they cannot place their jobs before those of other users. However, it is possible to give a user more rights. In the configuration file $CADENAS_USER/prendermanager.cfg in the "global" block there is a "role" key. If you set its value to "Admin" and start the client, you can change and delete all jobs. Re-sorting now also works without restrictions.
[93] The reason is, that the mxs data is not saved in an own „*.mxs“ file, but in the same-named .bmp file. Preview images are stored under $CADENAS_DATA/23d-libs in the respective directory. To that place you save them after the creation.