 |
Load the part to be classified in the CAD system.
Click the button
 Classify part.
-> Depending on settings and circumstances, possibly the dialog Choose Application is opened.
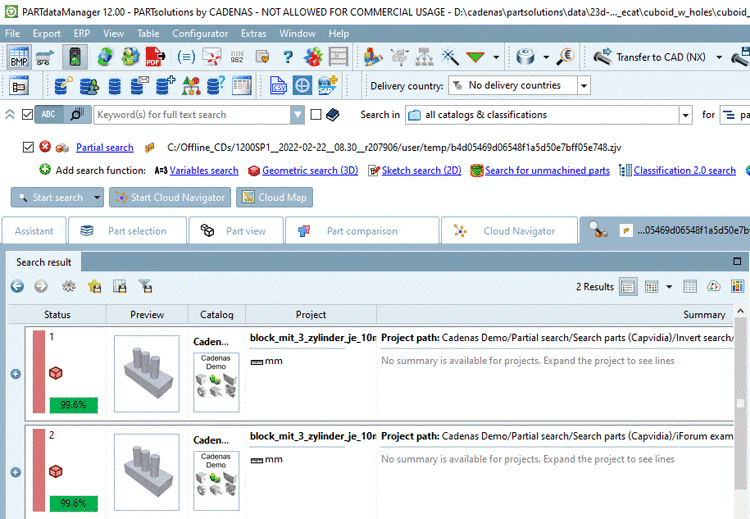
In the dialog, all found classes exceeding the set minimum similarity are shown.
The catalog with the existing class structure is set under
$CADENAS_USER\classificationwizard.cfg-> blockSettings-> keySearchFolders.The minimum similarity is set in
$CADENAS_USER\classificationwizard.cfg-> blockSettings-> keySimilarity.On the desired class, perform a double-click. (In this example this is
mounting/angle20holder.prj)-> The Classify dialog with a listing of the ERP variables (marked with
 ) and the variables of the characteristic
attribute table is shown.
) and the variables of the characteristic
attribute table is shown.The variables have been taken from the characteristic attribute table of the chosen target part.
Now fill out the single fields of the part to be classified. There are different options:
Manual input (in this example ERP number, material and price)
: When clicking the button, the Attribute selection dialog with a listing of all topological attributes is opened. Assign the desired values and confirm with .
: Necessary values will be set by . All such values are initially displayed in light gray (see e.g. in Fig. „ Classify dialog“ the value of "Price")
The use of enables the button. Manual setting of all light gray values should also enable the button.
(Once one of the methods out of or or has been used, the button is active.)
: Condition for the display of suggestions is that there are matching attributes in source and target project. If now the mouse cursor is moved over the button, the suggestions are displayed in green. Clicking the button confirms the use. Anytime you can perform changes with further on.
: If the mouse cursor is moved over the button, saved mappings are shown in blue. Clicking on the button confirms the use. Anytime you can perform changes with further on.
Optionally, you can add Technical Drawings.
In the list field, select the desired language and then click on the browse button in order to select the desired file.
Using
 you can create more lines, using
 you can delete entries.
(Once one method out of or or has been applied, the button becomes active.)
-> The classification process will start and one after another two messages appear in the taskbar right on the very bottom: First Classification process successfully started on and then finally The classification process was successful.
Now open the table of the target part.
-> The part to be classified has been added to the chosen target part in the form of a new table row.