5.9.2. Tabbed page: General
5.9.2.4. Menu item: Catalog settings (display at catalog level)
|  |
| Prev | Next |

Private catalogs cannot be published and furthermore for these no icons concerning publishing will be displayed. Detailed information on catalog publishing is found under Section 6.10, “ Publish catalog ”.
If you want to exclude certain directories (e.g. with print data) from publishing / CIP generation, proceed as follows:
Call up the PARTproject call up the General tab page at catalog level.
Under Catalog settings [Settings for the catalog] -> Subdirectories to exclude [Subfolders to exclude], click on Browse
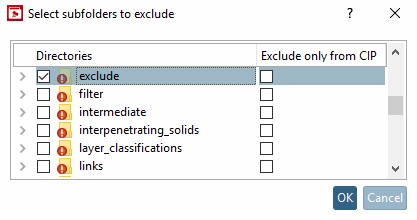
-> The Select subdirectories to exclude [Select subfolders to exclude] dialog box opens.
As soon as the checkbox in the column Directories is activated, the directory is neither uploaded to the publishing server (PARTcommunity) nor does it become content of the CIP file.
If the checkbox in the Exclude from CIP only [Exclude only from CIP] column is also activated, it is uploaded to the publishing server (PARTcommunity) and only excluded from the CIP.
Activate the checkbox for all directories to be excluded and confirm with .
-> The selected subdirectories are inserted in the input field separated by comma.
![[Note]](https://webapi.partcommunity.com/service/help/latest/pages/en/ecatalogsolutions/doc/images/note.png)
Note If a directory is marked as not to be published
 (see Section 6.10, “
Publish catalog
”), it is normally not displayed on end media. However, it will still be uploaded to the publishing server (PARTcommunity). If you want to be absolutely sure that it is not displayed under any circumstances, it is better to select the option Select subdirectories to exclude [Select subfolders to exclude] described here for the desired directories. However, if directories are excluded, it is particularly important to check whether there are any dependencies on required files.
(see Section 6.10, “
Publish catalog
”), it is normally not displayed on end media. However, it will still be uploaded to the publishing server (PARTcommunity). If you want to be absolutely sure that it is not displayed under any circumstances, it is better to select the option Select subdirectories to exclude [Select subfolders to exclude] described here for the desired directories. However, if directories are excluded, it is particularly important to check whether there are any dependencies on required files.The same applies to the option Hide directory (see Section 5.8.2.1.11, “ Hide directory / Visible directory ”). Hidden directories are also uploaded to the publishing server (PARTcommunity).
Hide frequently used terms (TagCloud)
The search functionality in PARTdataManager can be supported for each catalog with the TagCloud.
In order to optimize the terms displayed in the TagCloud, it is necessary to manually exclude all irrelevant terms in the catalog beforehand.
Before starting the function, in any case create a new full-text search index. Finally it is recommended to procede as follows:
-> You are requested to update the full-text search index.
-> The respective dialog box is opened.
Sort the frequency [Frequency] by clicking on the column header -> the high numbers at the top
Click on select/deselect all so that all entries are initially selected (=excluded).
Then go through the list from top to bottom in order to include about 30-50 terms again by clearing the respective checkboxes.
Ideally the procedure has to be repeated for all languages, at least for German and English.
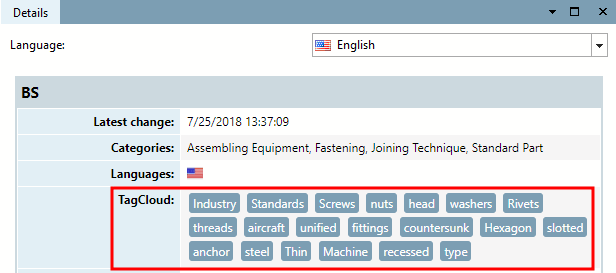
The result can then be checked again visually in the PARTdataManager in the Details docking window under TagCloud.
You can assign your own description for the installation process.
Translations can also be stored for these on the Translation tab page.
The term entered under Name for installation [Name of installation] is displayed when installing in PARTadmin or when installing from DVD.
Default language of the catalog [Default language of catalog]:
The field should contain the language in which the default translations are available. See Translation tab -> Default column.
The key in the project file is
DEFAULTLANG. This is also taken into account during tag list generation if set for the catalog.Catalog available in the languages
The translation languages are displayed on the Translation tab page.
Note A detailed description of the catalog translation can be found at Section 5.8.2.1.18, “ Translation ”.
Check ERP mapping [Check ERP-Mapping on upload] during upload:
It is recommended to leave the default setting of Yes, as this makes it easier to keep the mapping up to date and thus avoid problems during publication.
-> When uploading, the Check ERP mapping [Check ERP-Mapping] dialog opens.
If you change to No, no message appears when uploading that the mapping should be carried out. You must then use the commands Add [Add ERP-Mapping...] ERP mapping... and Edit ERP mapping [Edit ERP-Mapping...]... commands.
Details on ERP mapping can be found at Section 6.10.2, “ Check ERP mapping (Add ERP mapping... and Edit ERP mapping...) ”.
QA: If a catalog is to be created QA-managed, then Yes must be selected here in the list field.
Detailed information on PARTproject QA can be found at Chapter 6, PARTproject QA.
Server: The entry is made automatically for SVN-managed catalogs.
Manage render materials [Maintain render materials]:
After clicking on the Render materials dialog box opens. You can find detailed information on this under Section 5.9.2.8.4, “Detailed example of the Render Material function ”.
In addition, the render materials [Render materials] in PARTdesigner can be assigned as an area attribute. Further information on surface attributes can be found at Section 7.7.1.4, “ Face attributes ”.
Select the catalog and then click on the Button on the right to open the dialog.
If you click on the plus sign, the Add font dialog box opens. Specify the font file [Font file] and license name/file [License name/file] and confirm with .
Fonts stored in this way are then available for the text [Text] feature, for example (see Section 7.6.2.13, “ Text Feature ”).


![Designation for installation [Name of installation]](https://webapi.partcommunity.com/service/help/latest/pages/en/ecatalogsolutions/doc/resources/img/img_a8bb8756caf7401d84c6918b5ee9f54d.png)


